Epson 740c User's Guide - Page 36
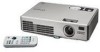
Connecting to a Computer - powerlite projector
 |
UPC - 010343851214
View all Epson 740c manuals
Add to My Manuals
Save this manual to your list of manuals |
Page 36 highlights
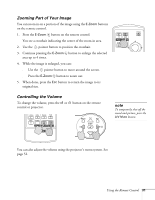
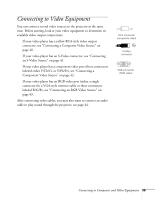
note If you connect a Windowsbased computer to the projector, you may see a New Hardware Wizard saying your computer has found a plug-and-play monitor; if so, click Cancel. note For newer PowerBooks with DVI connectors, see your computer's documentation to see how to use a DVI to VGA adapter (usually included with the computer) to connect to the VGA computer port. If you're using an older Macintosh and you can't connect the cable to your computer, you may need to use the Macintosh desktop adapter, as shown on page 37 (available from Epson; see page 11). Connecting to a Computer You can connect the PowerLite projector to any computer that has a standard video output (monitor) port, including desktop models, PC notebook and notebook computers, Macintosh PowerBooks and iBooks,® and hand-held devices. To connect to the blue Computer/ Component Video port (standard VGA cable connection), see the instructions below. After connecting to the computer, you may also want to do one of the following: ■ Connect a USB cable so you can use the remote control as a mouse; see page 38 ■ Connect an audio cable to play computer audio; see page 44 Connecting to the Computer Port You can connect to the blue Computer/Component Video port using the VGA computer cable that came with the projector (the monitor port on your computer must be a mini D-sub 15-pin port). 1. If you're using the VGA computer cable, connect one end to the projector's blue Computer/Component Video port, and the other end to your computer's monitor port. Then go to step 3. caution Don't try to force a connector to fit a port with a different shape or number of pins. You may damage the port or connector. 2. You can connect an optional stereo mini-jack audio cable to play sound through the projector (see page 44), or connect a USB cable to use the remote control as a mouse (see page 38). 36 Connecting to Computers and Other Equipment
-
 1
1 -
2
-
3
-
4
-
5
-
6
-
7
-
8
-
9
-
10
-
11
-
12
-
13
-
14
-
15
-
16
-
17
-
18
-
19
-
20
-
21
-
22
-
23
-
24
-
25
-
26
-
27
-
28
-
29
-
30
-
 31
31 -
 32
32 -
 33
33 -
 34
34 -
 35
35 -
 36
36 -
 37
37 -
 38
38 -
 39
39 -
 40
40 -
 41
41 -
42
-
43
-
44
-
45
-
46
-
47
-
48
-
49
-
50
-
51
-
52
-
53
-
54
-
55
-
56
-
57
-
58
-
59
-
60
-
61
-
62
-
63
-
64
-
65
-
66
-
67
-
68
-
69
-
70
-
71
-
72
-
73
-
74
-
75
-
76
-
77
-
78
-
79
-
80
-
81
-
82
-
83
-
84
-
85
-
86
-
87
-
88
-
89
-
90
-
91
-
92
-
93
-
94
-
95
-
96
-
97
-
98
-
99
-
100
 |
 |
