Epson 740c User's Guide - Page 63
warning, Hold the lamp as shown and pull it straight out.
 |
UPC - 010343851214
View all Epson 740c manuals
Add to My Manuals
Save this manual to your list of manuals |
Page 63 highlights
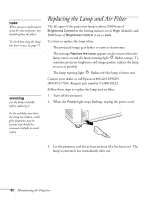
4. Turn the projector over. Press in on the tabs and lift up the lamp cover. 5. Loosen the two screws holding the lamp in place (you don't need to remove them). Loosen, but don't remove these screws 6. Hold the lamp as shown and pull it straight out. warning This product includes a lamp component that contains mercury (Hg). Please consult your state and local regulations regarding proper disposal and do not put in the trash. 7. Gently insert the new lamp. (If it doesn't fit easily, make sure it is facing the right way.) Maintaining the Projector 63
-
 1
1 -
2
-
3
-
4
-
5
-
6
-
7
-
8
-
9
-
10
-
11
-
12
-
13
-
14
-
15
-
16
-
17
-
18
-
19
-
20
-
21
-
22
-
23
-
24
-
25
-
26
-
27
-
28
-
29
-
30
-
31
-
32
-
33
-
34
-
35
-
36
-
37
-
38
-
39
-
40
-
41
-
42
-
43
-
44
-
45
-
46
-
47
-
48
-
49
-
50
-
51
-
52
-
53
-
54
-
55
-
56
-
57
-
 58
58 -
 59
59 -
 60
60 -
 61
61 -
 62
62 -
 63
63 -
 64
64 -
 65
65 -
 66
66 -
 67
67 -
 68
68 -
69
-
70
-
71
-
72
-
73
-
74
-
75
-
76
-
77
-
78
-
79
-
80
-
81
-
82
-
83
-
84
-
85
-
86
-
87
-
88
-
89
-
90
-
91
-
92
-
93
-
94
-
95
-
96
-
97
-
98
-
99
-
100
 |
 |

Maintaining the Projector
63
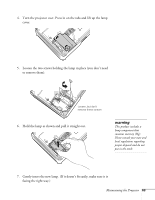
4.
Turn the projector over. Press in on the tabs and lift up the lamp
cover.
5.
Loosen the two screws holding the lamp in place (you don’t need
to remove them).
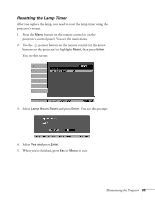
6.
Hold the lamp as shown and pull it straight out.
7.
Gently insert the new lamp. (If it doesn’t fit easily, make sure it is
facing the right way.)
Loosen, but don’t
remove these screws
warning
This product includes a
lamp component that
contains mercury (Hg).
Please consult your state and
local regulations regarding
proper disposal and do not
put in the trash.