Epson ActionLaser 1100 User Setup Information
Epson ActionLaser 1100 Manual
 |
View all Epson ActionLaser 1100 manuals
Add to My Manuals
Save this manual to your list of manuals |
Epson ActionLaser 1100 manual content summary:
- Epson ActionLaser 1100 | User Setup Information - Page 1
- Epson ActionLaser 1100 | User Setup Information - Page 2
printer and begin printing quickly. It also gives you instructions for routine maintenance. If you need detailed information on printer use or if you have problems printing, see your Reference Guide. ActionLaser is a trademark of Epson America, Inc. EPSON service. Manual is copy-right © 1994 by Epson - Epson ActionLaser 1100 | User Setup Information - Page 3
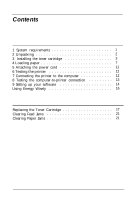
7 5 Attaching the power cord 11 6 Testing the printer 12 7 Connecting the printer to the computer 12 8 Testing the computer-to-printer connection 13 9 Setting up your software 14 Using Energy Wisely 16 Maintenance Replacing the Toner Cartridge 17 Clearing Feed Jams 21 Clearing Paper Jams 21 - Epson ActionLaser 1100 | User Setup Information - Page 4
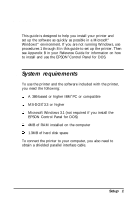
as quickly as possible in a Microsoft® Windows"' environment. If you are not running Windows, use procedures 1 through 8 in this guide to set up the printer. Then see Appendix B in your Reference Guide for information on how to install and use the EPSON® Control Panel for DOS. 1 System requirements - Epson ActionLaser 1100 | User Setup Information - Page 5
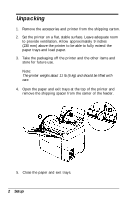
to provide ventilation. Allow approximately 9 inches (230 mm) above the printer to be able to fully extend the paper trays and load paper. 3. Take the packaging off the printer and the other items and store for future use. Note: The printer weighs about 11 lb (5 kg) and should be lifted with care - Epson ActionLaser 1100 | User Setup Information - Page 6
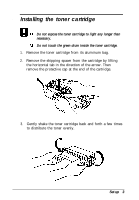
to light any longer than necessary. Do not touch the green drum inside the toner cartridge. 1. Remove the toner cartridge from its aluminum bag. 2. Remove the shipping spacer from the cartridge by lifting the horizontal tab in the direction of the arrow. Then remove the protective cap at the - Epson ActionLaser 1100 | User Setup Information - Page 7
4. Set the toner cartridge on a clean, flat surface. 5. While holding the cartridge steady with one hand, firmly grip the tab on the left side of the cartridge. Pull the clear seal all the way out with firm, even pressure as shown. Do not pull up on the seal. 6. Open the front cover - Epson ActionLaser 1100 | User Setup Information - Page 8
toner cartridge in the middle. Place the other hand on the rear of the printer to hold it steady while you insert the toner cartridge. 8. Insert the cartridge into the opening at the front of the printer. Position the locking knobs on both sides of the cartridge into the guides inside the printer - Epson ActionLaser 1100 | User Setup Information - Page 9
9. Slide the cartridge into the printer until it stops. Then press the cartridge firmly until it locks in place. 10. Close the front cover and press the top comers to lock the cover into position. Note: When the printer is turned on, the Ready light will not light if the toner cartridge is not - Epson ActionLaser 1100 | User Setup Information - Page 10
paper tray from its recessed position in the top of the printer and extend the paper support located at the top of the tray. 2. If you are loading legal-sized or other oversized paper, extend the support further by rotating the paper support extension out of its recess at the end of the paper - Epson ActionLaser 1100 | User Setup Information - Page 11
3. Position the paper guides slightly further apart than the width of the paper. 4. Open the exit tray. If you're printing oversized pages, pull out the paper support extension. 5. Fan a stack of paper and even up the edges. 6. Pull the paper release lever at the top right of the printer toward you. - Epson ActionLaser 1100 | User Setup Information - Page 12
7. Insert the paper stack (up to 100 sheets) between the paper guides of the paper tray. 8. Slide the paper guides against the paper stack. Make sure the paper guides do not press the paper too tightly. Setup 9 - Epson ActionLaser 1100 | User Setup Information - Page 13
not in the feed position. Note: To reload paper, pull the paper release lever toward the front of the printer and remove any paper from the paper tray. (Do not add paper to paper already loaded in the paper tray paper tray. Then push the paper release lever toward the back of the printer. 10 Setup - Epson ActionLaser 1100 | User Setup Information - Page 14
. 2. Insert the power cord into the AC receptacle at the back of the printer. Then plug the other end into a properly grounded outlet Use a grounded, three information in the memory of your computer or printer. Also avoid outlets on the same circuit with large motors or appliances that might - Epson ActionLaser 1100 | User Setup Information - Page 15
make sure the computer is off. 2. Connect a shielded parallel interface cable to the connector on the back of the printer. Fasten the connector with the two wire clips. 3. Connect the other end of the interface cable to the back of your computer. Tighten the screws - Epson ActionLaser 1100 | User Setup Information - Page 16
the following and press Enter: LPT1 Note: If you are using an interface port other than LPT1, be sure to specify the appropriate port. The printer prints the AUTOEXEC.BAT file. If nothing prints or the results are not what you expect, make sure you are using the proper cable and - Epson ActionLaser 1100 | User Setup Information - Page 17
Note: Although you can use other drivers, such as the HP® Laserjet® III driver, you should normally use the ActionLaser 1100 driver since it is specifically designed to work with this printer. When you install the EPSON Control Panel for Windows, the ActionLaser 1100 is automatically selected as the - Epson ActionLaser 1100 | User Setup Information - Page 18
box prompts you to select the communications port that will be used by the EPSON Control Panel and the printer. To use the default of LPT1, choose Connect. If you are using are now prompted to choose the Restart Windows button to restart Windows. Your Control Panel installation is complete. Setup 15 - Epson ActionLaser 1100 | User Setup Information - Page 19
Using Energy Wisely By purchasing this low-power, Energy Star compliant printer, you join a growing number of users concerned about conserving energy. Here are a few additional tips you can use to be even more energy-wise. If - Epson ActionLaser 1100 | User Setup Information - Page 20
of your print jobs. You can make toner cartridges last longer by using toner saving mode. See Chapter 2 in the Reference Guide for more information. If your printed images become too faint, you should replace the toner cartridge as follows: 1. Turn off the printer if it is on and disconnect the - Epson ActionLaser 1100 | User Setup Information - Page 21
one hand on top of the printer. With the other hand, grasp the toner cartridge by the molded center grip and pull upward until the cartridge unlocks and releases. Warning: When you open the printer or remove the toner cartridge, you expose components inside the printer that can be very hot. Avoid - Epson ActionLaser 1100 | User Setup Information - Page 22
by lifting the horizontal tab straight up. Then remove the protective cap at the end of the cartridge. 10. Gently shake the toner cartridge back and forth a few times to distribute the toner evenly. 11. While holding the cartridge steady with one hand, firmly grip the tab on the left side of the - Epson ActionLaser 1100 | User Setup Information - Page 23
the toner cartridge in the middle. Place the other hand on the rear of the printer to hold it steady while you insert the cartridge. 13. Insert the cartridge into the opening at the front of the printer. Position the locking knobs on both sides of the cartridge into the guides inside the printer. 20 - Epson ActionLaser 1100 | User Setup Information - Page 24
cartridge into the printer until it stops. Then push the cartridge firmly until it locks in place. 15. Close the front cover and press the top comers to lock it into position Clearing Feed Jams If the printer lever by pulling it toward the front of the printer. 2. Remove paper from the paper tray. 3. - Epson ActionLaser 1100 | User Setup Information - Page 25
tray. 4. Open the front cover. Warning: When you open the printer or remove the toner cartridge, you expose components inside the printer that can be very hot. Avoid touching the fuser area, which is located immediately above the toner cartridge when you open the front cover, and the motor, which is - Epson ActionLaser 1100 | User Setup Information - Page 26
downward slightly until it is level; then slide it out of the printer. The toner cartridge will not slide out smoothly unless it is in a level position. Jammed paper may have caught in the toner cartridge, making it difficult to remove the cartridge. Pull firmly to remove the paper along with the - Epson ActionLaser 1100 | User Setup Information - Page 27
. 9. If the jammed paper does not come out with the toner cartridge, look inside the printer. If the paper is still inside, draw it out from the front of the printer. 10. After removing the jammed paper, reinstall the toner cartridge and close the front cover. 11. Open the exit tray. 12. Tap
-
 1
1 -
 2
2 -
 3
3 -
 4
4 -
 5
5 -
 6
6 -
 7
7 -
8
-
9
-
10
-
11
-
12
-
13
-
14
-
15
-
16
-
17
-
18
-
19
-
20
-
21
-
22
-
23
-
24
-
25
-
26
-
27
 |
 |
