Epson ActionLaser 1100 User Setup Information - Page 18
To install the EPSON Control Panel for Windows, From the Program Manager, choose
 |
View all Epson ActionLaser 1100 manuals
Add to My Manuals
Save this manual to your list of manuals |
Page 18 highlights
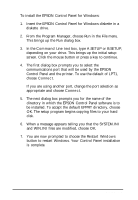
To install the EPSON Control Panel for Windows: 1. Insert the EPSON Control Panel for Windows diskette in a diskette drive. 2. From the Program Manager, choose Run in the File menu. This brings up the Run dialog box. 3. In the Command Line text box, type A:SETUP or B:SETUP, depending on your drive. This brings up the initial setup screen. Click the mouse button or press a key to continue. 4. The first dialog box prompts you to select the communications port that will be used by the EPSON Control Panel and the printer. To use the default of LPT1, choose Connect. If you are using another port, change the port selection as appropriate and choose Connect. 5. The next dialog box prompts you for the name of the directory in which the EPSON Control Panel software is to be installed. To accept the default EPPRT directory, choose OK. The setup program begins copying files to your hard disk. 6. When a message appears telling you that the SYSTEM.INI and WlN.INI files are modified, choose OK. 7. You are now prompted to choose the Restart Windows button to restart Windows. Your Control Panel installation is complete. Setup 15
-
 1
1 -
2
-
3
-
4
-
5
-
6
-
7
-
8
-
9
-
10
-
11
-
12
-
 13
13 -
 14
14 -
 15
15 -
 16
16 -
 17
17 -
 18
18 -
 19
19 -
 20
20 -
 21
21 -
 22
22 -
 23
23 -
24
-
25
-
26
-
27
 |
 |