Epson BrightLink 585Wi Installation Guide - Page 42
Appendix, Using the Easy Interactive Function (BrightLink models only), Attaching a Security Cable - driver
 |
View all Epson BrightLink 585Wi manuals
Add to My Manuals
Save this manual to your list of manuals |
Page 42 highlights
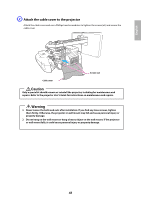
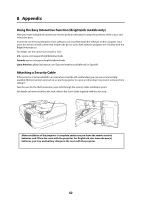
8 Appendix Using the Easy Interactive Function (BrightLink models only) After you install a BrightLink model, you need to perform calibration to align the positions of the cursor and interactive pens. In order to use the Easy Interactive Tools software, you must first install the software on the computer. OS X users also need to install a driver that enables the pen to work. Both software programs are included with the BrightLink projector. For details, see the online User's Guide or visit: U.S.: epson.com/support/brightlinkdownloads Canada: epson.ca/support/brightlinkdownloads Latin America: global.latin.epson.com/Soporte (website available only in Spanish) Attaching a Security Cable If the projector is to be installed in a room where it will be left unattended, you can use a commercially available theft-prevention wire lock to secure the projector to a post or other object to prevent someone from taking it. Pass the wire for the theft-prevention wire lock through the security cable installation point. For details on how to lock the wire lock, refer to the User's Guide supplied with the wire lock. After installation of the projector is complete, make sure you leave the remote control, batteries, and CDs in the room with the projector. For BrightLink, also leave the pen(s), batteries, pen tray, and battery charger in the room with the projector. 42
-
 1
1 -
2
-
3
-
4
-
5
-
6
-
7
-
8
-
9
-
10
-
11
-
12
-
13
-
14
-
15
-
16
-
17
-
18
-
19
-
20
-
21
-
22
-
23
-
24
-
25
-
26
-
27
-
28
-
29
-
30
-
31
-
32
-
33
-
34
-
35
-
36
-
 37
37 -
 38
38 -
 39
39 -
 40
40 -
 41
41 -
 42
42 -
 43
43 -
 44
44 -
 45
45 -
 46
46 -
 47
47 -
48
-
49
-
50
-
51
-
52
-
53
-
54
-
55
-
56
-
57
-
58
-
59
-
60
-
61
-
62
-
63
-
64
-
65
-
66
-
67
-
68
-
69
-
70
-
71
-
72
-
73
-
74
-
75
-
76
-
77
-
78
-
79
-
80
-
81
-
82
-
83
-
84
-
85
-
86
-
87
-
88
 |
 |
