Epson BrightLink 585Wi Installation Guide - Page 5
Package Contents
 |
View all Epson BrightLink 585Wi manuals
Add to My Manuals
Save this manual to your list of manuals |
Page 5 highlights
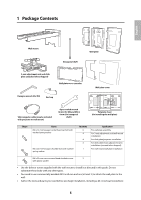
1 Package Contents English Wall mount Hexagonal shaft Wall plate 3-axis adjustment unit and slide plate (attached when shipped) Wall plate cover extender Hexagon wrench (for M4) End cap Wall plate cover VGA computer cable (may be included with projector or wall mount) Open-ended wrench 13 mm (for M8 and M6) x 6 mm (for hexagonal shaft) Template sheet (for installing the wall plate) Shape Name M4 x 12 mm hexagon socket head cap bolt with washer/spring washer M6 x 20 mm hexagon shoulder bolt with washer/ spring washer Quantity 6 4 4 2 1 Application For wall plate assembly For 3-axis adjustment unit/wall mount installation For slide plate/projector installation For slide plate/3-axis adjustment unit installation (secured when shipped) For wall mount/wall plate installation M6 x 20 mm cross recessed head shoulder screw 3 with plastic washer • Use the bolts or screws supplied with the wall mount to install it as directed in this guide. Do not substitute these bolts with any other types. • You need to use commercially available M10 x 60 mm anchors (at least 3) to attach the wall plate to the wall. • Gather the tools and parts you need before you begin installation, including a #3 cross-head screwdriver. 5
-
 1
1 -
 2
2 -
 3
3 -
 4
4 -
 5
5 -
 6
6 -
 7
7 -
 8
8 -
 9
9 -
 10
10 -
 11
11 -
12
-
13
-
14
-
15
-
16
-
17
-
18
-
19
-
20
-
21
-
22
-
23
-
24
-
25
-
26
-
27
-
28
-
29
-
30
-
31
-
32
-
33
-
34
-
35
-
36
-
37
-
38
-
39
-
40
-
41
-
42
-
43
-
44
-
45
-
46
-
47
-
48
-
49
-
50
-
51
-
52
-
53
-
54
-
55
-
56
-
57
-
58
-
59
-
60
-
61
-
62
-
63
-
64
-
65
-
66
-
67
-
68
-
69
-
70
-
71
-
72
-
73
-
74
-
75
-
76
-
77
-
78
-
79
-
80
-
81
-
82
-
83
-
84
-
85
-
86
-
87
-
88
 |
 |
