Epson BrightLink 585Wi Installation Guide - Page 9
Positioning the Projector
 |
View all Epson BrightLink 585Wi manuals
Add to My Manuals
Save this manual to your list of manuals |
Page 9 highlights
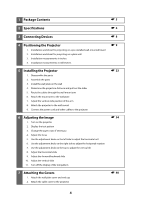
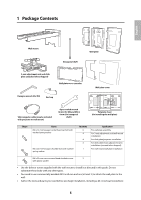
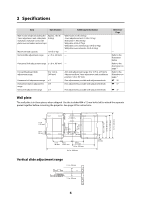
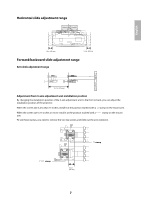
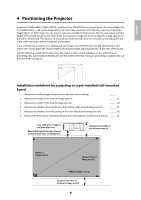
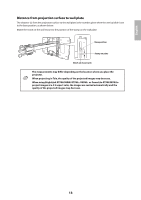
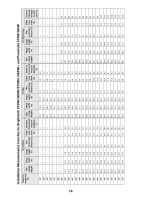
English 4 Positioning the Projector BrightLink 575Wi/585Wi/575Wi+/585Wi+ and PowerLite 575W/585W can project up to 100 inches diagonally for a WXGA image or 88 inches diagonally for an XGA image. PowerLite 570/580 can project up to 93 inches diagonally for an XGA image. You can project onto a pre-installed whiteboard or directly onto a plain wall. The height of the included wall mount determines the maximum image size and how high the image appears on the wall or whiteboard. The distance of the projector from the wall (once it is mounted on the adjustable arm of the wall mount) also affects image size and position. If you are planning to project on a whiteboard, the image may not fill the entire board, depending on the aspect ratio. If you match the image height to the board's height, gaps may appear on the sides of the board. Use the following worksheets to determine the proper location of the wall plate on the wall. If you are projecting onto a pre-installed whiteboard, use the worksheet below. If you are projecting on a plain wall, use the worksheet on page 10. Installation worksheet for projecting on a pre-installed wall-mounted board 1. Measure the ceiling height (distance from the floor to the ceiling). _____ 2. Measure the height of the board's image area (h). _____ (h) 3. Measure the width of the board's image area (w). _____ (w) 4. Measure the distance from the floor to the bottom of the board's image area (f ). _____ (f ) 5. Measure the distance from the ceiling to the top of the board's image area (d). _____ (d) 6. Measure the thickness of the board (distance from the projection surface to the wall) (x). _____ (x) 10 in. (254 mm)-height of wall plate plus cover Required distance from top of image area to bottom holes of wall plate (c) Distance from ceiling to top of image area (d) Height of image area (h) Diagonal size of image area (S) Width of image area (w) Distance from floor to bottom of image area (f) 9
-
 1
1 -
2
-
3
-
 4
4 -
 5
5 -
 6
6 -
 7
7 -
 8
8 -
 9
9 -
 10
10 -
 11
11 -
 12
12 -
 13
13 -
 14
14 -
15
-
16
-
17
-
18
-
19
-
20
-
21
-
22
-
23
-
24
-
25
-
26
-
27
-
28
-
29
-
30
-
31
-
32
-
33
-
34
-
35
-
36
-
37
-
38
-
39
-
40
-
41
-
42
-
43
-
44
-
45
-
46
-
47
-
48
-
49
-
50
-
51
-
52
-
53
-
54
-
55
-
56
-
57
-
58
-
59
-
60
-
61
-
62
-
63
-
64
-
65
-
66
-
67
-
68
-
69
-
70
-
71
-
72
-
73
-
74
-
75
-
76
-
77
-
78
-
79
-
80
-
81
-
82
-
83
-
84
-
85
-
86
-
87
-
88
 |
 |