Epson BrightLink 695Wi Installation Guide - Control Pad and Touch Unit - Page 20
Installing the Touch Unit with the bracket, When adjusting the dials, make sure to stop turning when
 |
View all Epson BrightLink 695Wi manuals
Add to My Manuals
Save this manual to your list of manuals |
Page 20 highlights
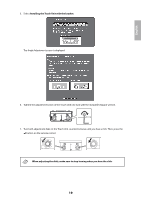
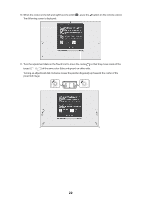
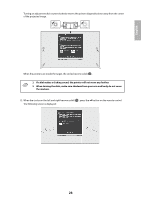
English 5. Select Installing the Touch Unit with the bracket. The Angle Adjustment screen is displayed. 6. Tighten the adjustment screw on the Touch Unit one turn with the included hexagon wrench. 7. Turn both adjustment dials on the Touch Unit counterclockwise until you hear a click. Then, press the button on the remote control. When adjusting the dials, make sure to stop turning when you hear the click. 19
-
 1
1 -
2
-
3
-
4
-
5
-
6
-
7
-
8
-
9
-
10
-
11
-
12
-
13
-
14
-
 15
15 -
 16
16 -
 17
17 -
 18
18 -
 19
19 -
 20
20 -
 21
21 -
 22
22 -
 23
23 -
 24
24 -
 25
25 -
26
-
27
-
28
-
29
-
30
-
31
-
32
-
33
-
34
-
35
-
36
-
37
-
38
-
39
-
40
-
41
-
42
-
43
-
44
-
45
-
46
-
47
-
48
-
49
-
50
-
51
-
52
-
53
-
54
-
55
-
56
-
57
-
58
-
59
-
60
-
61
-
62
-
63
-
64
-
65
-
66
-
67
-
68
-
69
-
70
-
71
-
72
-
73
-
74
-
75
-
76
-
77
-
78
-
79
-
80
-
81
-
82
-
83
-
84
-
85
-
86
-
87
-
88
-
89
-
90
 |
 |

19
English
5.
Select
Installing the Touch Unit with the bracket
.
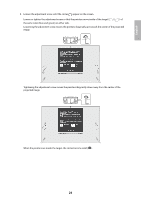
The Angle Adjustment screen is displayed.
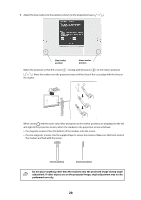
6.
Tighten the adjustment screw on the Touch Unit one turn with the included hexagon wrench.
7.
Turn both adjustment dials on the Touch Unit counterclockwise until you hear a click. Then, press the
button on the remote control.
When adjusting the dials, make sure to stop turning when you hear the click.