Epson EPL-7500 User Manual - Page 53
Adjusting print density, dark, adjust the print density as follows
 |
View all Epson EPL-7500 manuals
Add to My Manuals
Save this manual to your list of manuals |
Page 53 highlights
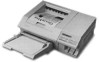
Testing the Printer If the start page prints correctly, you can skip to the section on connecting the printer to your computer later in this chapter. If the start page does not operate properly, see Chapter 7 for troubleshooting information. Adjusting print density You can control the overall density of the printed image with the print density control knob. If your test print is too light or too dark, adjust the print density as follows: 1. Lift the latch to open the printer cover to the lower position. 2. Locate the yellow density control knob inside the front right corner of the printer, as shown below. Testing and Connecting Your Printer 2-13
-
 1
1 -
2
-
3
-
4
-
5
-
6
-
7
-
8
-
9
-
10
-
11
-
12
-
13
-
14
-
15
-
16
-
17
-
18
-
19
-
20
-
21
-
22
-
23
-
24
-
25
-
26
-
27
-
28
-
29
-
30
-
31
-
32
-
33
-
34
-
35
-
36
-
37
-
38
-
39
-
40
-
41
-
42
-
43
-
44
-
45
-
46
-
47
-
 48
48 -
 49
49 -
 50
50 -
 51
51 -
 52
52 -
 53
53 -
 54
54 -
 55
55 -
 56
56 -
 57
57 -
 58
58 -
59
-
60
-
61
-
62
-
63
-
64
-
65
-
66
-
67
-
68
-
69
-
70
-
71
-
72
-
73
-
74
-
75
-
76
-
77
-
78
-
79
-
80
-
81
-
82
-
83
-
84
-
85
-
86
-
87
-
88
-
89
-
90
-
91
-
92
-
93
-
94
-
95
-
96
-
97
-
98
-
99
-
100
-
101
-
102
-
103
-
104
-
105
-
106
-
107
-
108
-
109
-
110
-
111
-
112
-
113
-
114
-
115
-
116
-
117
-
118
-
119
-
120
-
121
-
122
-
123
-
124
-
125
-
126
-
127
-
128
-
129
-
130
-
131
-
132
-
133
-
134
-
135
-
136
-
137
-
138
-
139
-
140
-
141
-
142
-
143
-
144
-
145
-
146
-
147
-
148
-
149
-
150
-
151
-
152
-
153
-
154
-
155
-
156
-
157
-
158
-
159
-
160
-
161
-
162
-
163
-
164
-
165
-
166
-
167
-
168
-
169
-
170
-
171
-
172
-
173
-
174
-
175
-
176
-
177
-
178
-
179
-
180
-
181
-
182
-
183
-
184
-
185
-
186
-
187
-
188
-
189
-
190
-
191
-
192
-
193
-
194
-
195
-
196
-
197
-
198
-
199
-
200
-
201
-
202
-
203
-
204
-
205
-
206
-
207
-
208
-
209
-
210
-
211
-
212
-
213
-
214
-
215
-
216
-
217
-
218
-
219
-
220
-
221
-
222
-
223
-
224
-
225
-
226
-
227
-
228
-
229
-
230
-
231
-
232
-
233
-
234
-
235
-
236
-
237
-
238
-
239
-
240
-
241
-
242
-
243
-
244
 |
 |

Testing the Printer
If the start page prints correctly, you
can
skip to the section on
connecting the printer to your computer later in this chapter. If the
start page does not operate properly, see Chapter 7 for
troubleshooting information.
Adjusting print density
You can control the overall density of the printed image with the
print density control knob. If your test print is too light or too
dark, adjust the print density as follows:
1.
Lift the latch to open the printer cover to the lower position.
2.
Locate the yellow density control knob inside the front right
corner of the printer, as shown below.
Testing and Connecting Your Printer
2-13