Garmin StreetPilot 2610 Owners Manual - Page 7
Introduction, Step 3, Further Recommendations - 2650
 |
UPC - 753759042141
View all Garmin StreetPilot 2610 manuals
Add to My Manuals
Save this manual to your list of manuals |
Page 7 highlights
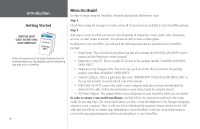
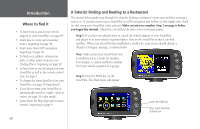
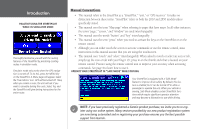
Note: This manual assumes that you have transfered maps to your StreetPilot. If you do not download City Navigator maps to your StreetPilot, you will not see some of the information or features described throughout this manual. Additionally, you will see minimal detail of major roads and highways on your StreetPilot. Step 3: Try out your StreetPilot! Use the Tutorial on page vi to learn how to find a nearby restaurant and create a route to it. In addition to your StreetPilot, you will need the following items that are included in the StreetPilot package: • Vehicle adapter. This is a 12/24 volt DC adapter with an external speaker system that connects to your vehicle and your StreetPilot. • Dash mount or portable bean bag mount. If you would like to mount your StreetPilot to your vehicle right away, see the instructions on page 61. Once you complete these three steps, you will be set up and ready to enjoy the full operation of the StreetPilot! Further Recommendations: Read the StreetPilot 2610/2650 owner's manual to learn how to create routes that include multiple destinations, how to specify areas or road segments to avoid when calculating routes, and how to use a variety of other exciting features. Read the MapSource owner's manual to learn how to create routes and waypoints on your computer and then transfer this information to your StreetPilot. Introduction Getting Started Garmin USB Cable Do NOT connect the Garmin USB cable to your computer until you have followed the instructions in the Setup Guide. Garmin-specific drivers must be installed on your computer before you connect the USB cable to your computer. vii
-
 1
1 -
 2
2 -
 3
3 -
 4
4 -
 5
5 -
 6
6 -
 7
7 -
 8
8 -
 9
9 -
 10
10 -
 11
11 -
 12
12 -
13
-
14
-
15
-
16
-
17
-
18
-
19
-
20
-
21
-
22
-
23
-
24
-
25
-
26
-
27
-
28
-
29
-
30
-
31
-
32
-
33
-
34
-
35
-
36
-
37
-
38
-
39
-
40
-
41
-
42
-
43
-
44
-
45
-
46
-
47
-
48
-
49
-
50
-
51
-
52
-
53
-
54
-
55
-
56
-
57
-
58
-
59
-
60
-
61
-
62
-
63
-
64
-
65
-
66
-
67
-
68
-
69
-
70
-
71
-
72
-
73
-
74
-
75
-
76
-
77
-
78
-
79
-
80
-
81
-
82
-
83
-
84
-
85
-
86
-
87
-
88
-
89
-
90
-
91
-
92
-
93
-
94
-
95
 |
 |