Gateway NV-59C Service Guide - Page 60
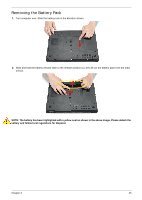
Removing the HDD/WLAN/DIMM Door, Lift the door clear off the device, exposing the HDD, DIMM
 |
View all Gateway NV-59C manuals
Add to My Manuals
Save this manual to your list of manuals |
Page 60 highlights
Removing the HDD/WLAN/DIMM Door 1. Remove three (3) screws from the HDD/WLAN/DIMM door. Step HDD/WLAN/ DIMM door Size M2.5*8 Quantity 2 2. Lift the door beginning from the inner edge as shown. Screw Type 3. Lift the door clear off the device, exposing the HDD, DIMM, and WLAN modules. 50 Chapter 3
-
 1
1 -
2
-
3
-
4
-
5
-
6
-
7
-
8
-
9
-
10
-
11
-
12
-
13
-
14
-
15
-
16
-
17
-
18
-
19
-
20
-
21
-
22
-
23
-
24
-
25
-
26
-
27
-
28
-
29
-
30
-
31
-
32
-
33
-
34
-
35
-
36
-
37
-
38
-
39
-
40
-
41
-
42
-
43
-
44
-
45
-
46
-
47
-
48
-
49
-
50
-
51
-
52
-
53
-
54
-
 55
55 -
 56
56 -
 57
57 -
 58
58 -
 59
59 -
 60
60 -
 61
61 -
 62
62 -
 63
63 -
 64
64 -
 65
65 -
66
-
67
-
68
-
69
-
70
-
71
-
72
-
73
-
74
-
75
-
76
-
77
-
78
-
79
-
80
-
81
-
82
-
83
-
84
-
85
-
86
-
87
-
88
-
89
-
90
-
91
-
92
-
93
-
94
-
95
-
96
-
97
-
98
-
99
-
100
-
101
-
102
-
103
-
104
-
105
-
106
-
107
-
108
-
109
-
110
-
111
-
112
-
113
-
114
-
115
-
116
-
117
-
118
-
119
-
120
-
121
-
122
-
123
-
124
-
125
-
126
-
127
-
128
-
129
-
130
-
131
-
132
-
133
-
134
-
135
-
136
-
137
-
138
-
139
-
140
-
141
-
142
-
143
-
144
-
145
-
146
-
147
-
148
-
149
-
150
-
151
-
152
-
153
-
154
-
155
-
156
-
157
-
158
-
159
-
160
-
161
-
162
-
163
-
164
-
165
-
166
-
167
-
168
-
169
-
170
-
171
-
172
-
173
-
174
-
175
-
176
-
177
-
178
-
179
-
180
-
181
-
182
-
183
-
184
-
185
-
186
-
187
-
188
-
189
-
190
-
191
-
192
-
193
-
194
-
195
-
196
-
197
-
198
-
199
-
200
-
201
-
202
-
203
-
204
-
205
-
206
-
207
-
208
-
209
-
210
-
211
-
212
-
213
-
214
-
215
-
216
-
217
-
218
-
219
-
220
-
221
-
222
 |
 |

50
Chapter 3
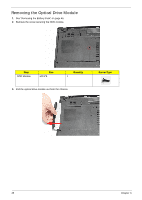
Removing the HDD/WLAN/DIMM Door
1.
Remove three (3) screws from the HDD/WLAN/DIMM door.
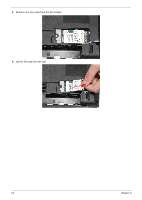
2.
Lift the door beginning from the inner edge as shown.
3.
Lift the door clear off the device, exposing the HDD, DIMM, and WLAN modules.
Step
Size
Quantity
Screw Type
HDD/WLAN/
DIMM door
M2.5*8
2