Genie ChainLift 800 Owner's Manual - Page 4
Pre-installation Check List - extension kit
 |
View all Genie ChainLift 800 manuals
Add to My Manuals
Save this manual to your list of manuals |
Page 4 highlights
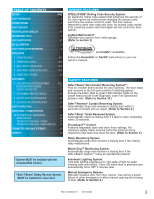
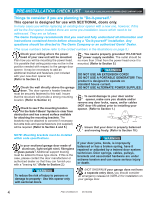
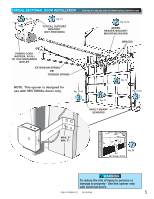
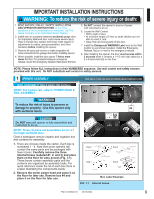
PRE-INSTALLATION CHECK LIST FOR HELP-1.800.354.3643 OR WWW.GENIECOMPANY.COM Things to consider if you are planning to "Do-it-yourself." This opener is designed for use with SECTIONAL doors only. In many cases you will be replacing an existing door opener with a new one, however, if this will be the first opener installed there are some pre-installation issues which need to be addressed. They are as follows: The Genie Company recommends that you read and fully understand all information and instructions contained herein before choosing a "Do-it-yourself" installation. Any questions should be directed to The Genie Company or an authorized Genie® Dealer. (The issue numbers below refer to the circled numbers in the illustrations on page 5.) 1 Check your ceiling where the power head of your new unit will be mounted. Plan how you will be mounting the power head. It is possible that ceiling joists may not be in the position needed with respect to the garage door opener. It may be necessary to add an additional bracket and fasteners (not included with your new door opener kit). (Refer to Section 2.) 2 Check the wall directly above the garage door. The door opener's header bracket must be securely fastened to this wall. Insure that the structure will provide a strong mounting location. (Refer to Section 2.) 3 Check to see if the mounting location for the Safe-T-Beam® System is clear from obstruction and has a wood surface available for attaching the mounting brackets. The brackets may be attached to concrete if necessary but extra tools and special fasteners (not supplied) will be required. (Refer to Section 4 and 5.) 5 You need a properly grounded 110-120 Volt power supply available. The outlet should be no more than 3 feet from the power head once it is mounted. (Refer to Section 5.) WARNING DO NOT USE AN EXTENSION CORD! DO NOT USE A PORTABLE GENERATOR! This product is designed to operate on standard house current. DO NOT USE ALTERNATE POWER SUPPLIES. 6 To avoid damage to your door and/or opener, make sure you disable and/or remove any door locks, ropes, and/or cables (NOT door lift cables) prior to installing your opener. (Refer to Section 1.) Remove Remove 7 Insure that your door is properly balanced and moving freely. (Refer to Section 10.) NOTE: Mounting brackets must be installed within code specifications. WARNING 4 Is your sectional garage door made of aluminum, light-weight steel, fiberglass or glass panels? Additional support bracing must be added to these type doors. If this is the case, please contact the door manufacturer or authorized dealer so that they can furnish you with a "bracing kit." (Refer to Section 2.) If your door jams, binds, is improperly balanced or has a broken spring, have it repaired or adjusted by a trained door system technician. Door springs, cables, pulleys, brackets and associated hardware are under extreme tension and can cause serious injury or death. WARNING To reduce the risk of injury to persons or damage to property - Use this opener only with sectional doors. 8 (NOT SHOWN) If your garage does not have a separate entry door, you should consider an emergency release kit (GER-2) for installation on your garage door. 4 PN# 37026500123 05/15/2009
-
 1
1 -
 2
2 -
 3
3 -
 4
4 -
 5
5 -
 6
6 -
 7
7 -
 8
8 -
 9
9 -
 10
10 -
11
-
12
-
13
-
14
-
15
-
16
-
17
-
18
-
19
-
20
-
21
-
22
-
23
-
24
-
25
-
26
-
27
-
28
-
29
-
30
 |
 |