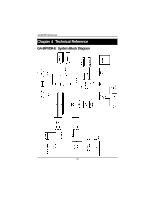
Gigabyte GA-8IPXDR-E User Manual - Page 62
Step 5., Typical, Custom
 |
View all Gigabyte GA-8IPXDR-E manuals
Add to My Manuals
Save this manual to your list of manuals |
Page 62 highlights
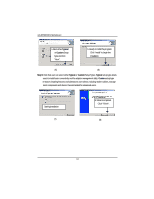
GA-8IPXDR-E(C) Motherboard 5.Slect either Typical or Custom Setup type and click "Next". 6. Ready to install the program. Click "Install" to begin the installation. (5) (6) Step 5. Note that user can select either Typical or Custom Setup Types. Typical setup type allows users to install basic connectivity and the adapter management utility. Custom setup type embraces installing features and subfeatures user selects, including modern utilities, manage ment components and drivers. Recommended for advanced users. Starting installation (7) 8. Wizard completed. Click "Finish". (8) 62
-
 1
1 -
2
-
3
-
4
-
5
-
6
-
7
-
8
-
9
-
10
-
11
-
12
-
13
-
14
-
15
-
16
-
17
-
18
-
19
-
20
-
21
-
22
-
23
-
24
-
25
-
26
-
27
-
28
-
29
-
30
-
31
-
32
-
33
-
34
-
35
-
36
-
37
-
38
-
39
-
40
-
41
-
42
-
43
-
44
-
45
-
46
-
47
-
48
-
49
-
50
-
51
-
52
-
53
-
54
-
55
-
56
-
 57
57 -
 58
58 -
 59
59 -
 60
60 -
 61
61 -
 62
62 -
 63
63 -
 64
64 -
 65
65 -
 66
66 -
 67
67 -
68
-
69
-
70
 |
 |

GA-8IPXDR-E(C) Motherboard
62
(5)
6. Ready to install the program.
Click "Install" to begin the
installation.
(6)
Starting installation
(7)
8. Wizard completed.
Click "Finish".
(8)
Step 5.
Note that user can select either
Typical
or
Custom
Setup Types.
Typical
setup type allows
users to install basic connectivity and the adapter management utility.
Custom
setup type
embraces installing features and subfeatures user selects, including modern utilities, manage
ment components and drivers. Recommended for advanced users.
5.Slect either
Typical
or
Custom
Setup
type and click
"Next".