Gigabyte GA-EP45-DS3 Manual - Page 81
A. Before installing Ultra TPM, follow the steps below in sequence, B. Instructions for using Ultra
 |
View all Gigabyte GA-EP45-DS3 manuals
Add to My Manuals
Save this manual to your list of manuals |
Page 81 highlights
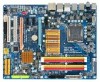
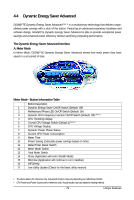
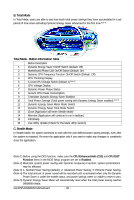
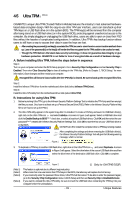
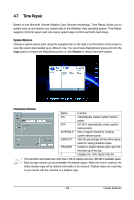
4-5 Ultra TPM (Note 1) GIGABYTE's unique Ultra TPM (Trusted Platform Module) features the industry's most advanced hardwarebased data encryption design. With the easy-to-use Ultra TPM user interface, users can store/back up their TPM keys on a USB flash drive or in the system BIOS. The TPM key(s) will be removed from the computer after being stored on a USB flash drive (or in the system BIOS), protecting against unauthorized access to the computer. By simply plugging or unplugging the USB flash drive, users are able to open or close their PSD files without the hassles of complicated configurations. In addition, Ultra TPM's key backup function allows users to still have a way to access their data in case the keys are lost. • After creating the password(s) and key(s) associated the TPM, be sure to store them in a secure location and back them up. Loss of the password(s) or the key(s) will render the files encrypted via the TPM unable to be cracked or read. • Though the TPM delivers the latest data security technology, it does not guarantee data integrity or give hardware protection. GIGABYTE is not liable for loss of encrypted data as a result of hardware damage. A. Before installing Ultra TPM, follow the steps below in sequence: Step 1: Turn on your computer and enter the BIOS Setup program. Go to Security Chip Configuration and set Security Chip to Enabled. Then enter Clear Security Chip to clear all settings in the TPM chip. (Refer to Chapter 2, "BIOS Setup," for more information.) Save changes and then restart your computer. Encrypted files will become inaccessible after the TPM chip is cleared. Be sure to back up the encrypted files first. Step 2: Install the Infineon TPM driver from the motherboard driver disk (select Infineon TPM Driver). Step 3: Install the Ultra TPM utility from the motherboard driver disk (select Ultra TPM). B. Instructions for using Ultra TPM: 1. Before launching Ultra TPM, go to the Infineon Security Platform Settings Tool to initialize the TPM chip and then encrypt the files you want. (You have to at least set up a Personal Secure Drive (PSD). Refer to the Infineon Security Platform Help file to see how to set up the PSD.) 2. The Ultra TPM utility appears in the system tray after it is installed. To create a TPM key and save it to USB flash drive(s), right-click on the Ultra TPM icon and select Initialize. A screen in Figure 1 will appear. Select a USB flash drive and click the Enable Backup to BIOS(Note 2) check box, or select at least two USB flash drives. Click OK and then enter the user password(Note 3) created with Infineon Security Platform Settings Tool. Click OK to store the key on your USB flash drive or in the BIOS. DO NOT turn off or restart the computer when a TPM key is being created. After completing the settings and when removing the USB flash drive(s), the Infineon Security Platform Settings Tool will give the following warning message, which is normal. Figure 1 3. To duplicate a TPM key to another USB flash drive, right-click on the Ultra TPM icon and select Duplicate. A screen in Figure 2 will appear. Select the drive letter of the source USB flash drive and then select the drive letter of the destination USB flash drive. Click OK to complete. Figure 2 Only for GA-EP45-DS3R. (Note 1) (Note 2) (Note 3) (Note 4) This feature is optional due to different regional policy. When more than one user stores their TPM keys in the BIOS, the latter key will replace the former key. If you incorrectly enter the password three times, Ultra TPM will be locked. To be able to enter the password again, go to the Security Chip Configuration menu in BIOS Setup and then set Security Chip to Enabled/Activate. If you want to uninstall the Ultra TPM utility, be sure to insert the USB flash drive containing the TPM key into your computer before the uninstallation. - 81 - Unique Features
-
 1
1 -
2
-
3
-
4
-
5
-
6
-
7
-
8
-
9
-
10
-
11
-
12
-
13
-
14
-
15
-
16
-
17
-
18
-
19
-
20
-
21
-
22
-
23
-
24
-
25
-
26
-
27
-
28
-
29
-
30
-
31
-
32
-
33
-
34
-
35
-
36
-
37
-
38
-
39
-
40
-
41
-
42
-
43
-
44
-
45
-
46
-
47
-
48
-
49
-
50
-
51
-
52
-
53
-
54
-
55
-
56
-
57
-
58
-
59
-
60
-
61
-
62
-
63
-
64
-
65
-
66
-
67
-
68
-
69
-
70
-
71
-
72
-
73
-
74
-
75
-
 76
76 -
 77
77 -
 78
78 -
 79
79 -
 80
80 -
 81
81 -
 82
82 -
 83
83 -
 84
84 -
 85
85 -
 86
86 -
87
-
88
-
89
-
90
-
91
-
92
-
93
-
94
-
95
-
96
-
97
-
98
-
99
-
100
-
101
-
102
-
103
-
104
-
105
-
106
-
107
-
108
-
109
-
110
-
111
-
112
-
113
-
114
-
115
-
116
 |
 |