Gigabyte GA-EP45-DS3 Manual - Page 84
A. Enabling Teaming Functionality in Windows XP
 |
View all Gigabyte GA-EP45-DS3 manuals
Add to My Manuals
Save this manual to your list of manuals |
Page 84 highlights
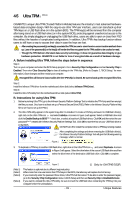
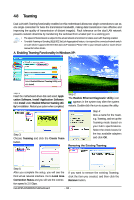
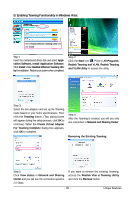
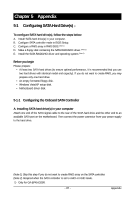
4-8 Teaming Dual LAN with Teaming functionality enabled on this motherboard allows two single connections to act as one single connection for twice the transmission bandwidth, making data transmission more effective and improving the quality of transmission of distant image(s). Fault tolerance on the dual LAN network prevents network downtime by transferring the workload from a failed port to a working port. • The speed of transmission is subject to the actual network environment or status even with Teaming enabled. • To enable Teaming or Bonding (IEEE 802.3ad Link Aggregation) feature, it is required the connected network switch or router device supports the IEEE 802.3ad LACP standard. Please refer to your network switch or router device manual for further details. A. Enabling Teaming Functionality in Windows XP: Select Realtek Ethernet Teaming Utility and click Install. Step 1: Insert the motherboard driver disk and select Application Software, Install Application Software. Click Install under Realtek Ethernet Teaming Utility for installation. Restart your system when completed. Step 3: Choose Teaming and click the Create Team button. Step 2: The Realtek Ethernet Diagnostic Utility icon appears in the system tray after the system restarts. Double-click the icon to access the utility. Step 4: Give a name for the Team, e.g. Teaming, and set up the Teaming mode based on your hub's specifications. Select the check boxes for the two available adapters and click OK. Removing the Existing Teaming: Step 5: After you complete the setup, you will see the third virtual network interface. Go to Local Area Connection Status and you will see the connection speed is 2.0 Gbps. If you want to remove the existing Teaming, click the item you created, and then click the Remove button. GA-EP45-DS3R/DS3 Motherboard - 84 -
-
 1
1 -
2
-
3
-
4
-
5
-
6
-
7
-
8
-
9
-
10
-
11
-
12
-
13
-
14
-
15
-
16
-
17
-
18
-
19
-
20
-
21
-
22
-
23
-
24
-
25
-
26
-
27
-
28
-
29
-
30
-
31
-
32
-
33
-
34
-
35
-
36
-
37
-
38
-
39
-
40
-
41
-
42
-
43
-
44
-
45
-
46
-
47
-
48
-
49
-
50
-
51
-
52
-
53
-
54
-
55
-
56
-
57
-
58
-
59
-
60
-
61
-
62
-
63
-
64
-
65
-
66
-
67
-
68
-
69
-
70
-
71
-
72
-
73
-
74
-
75
-
76
-
77
-
78
-
 79
79 -
 80
80 -
 81
81 -
 82
82 -
 83
83 -
 84
84 -
 85
85 -
 86
86 -
 87
87 -
 88
88 -
 89
89 -
90
-
91
-
92
-
93
-
94
-
95
-
96
-
97
-
98
-
99
-
100
-
101
-
102
-
103
-
104
-
105
-
106
-
107
-
108
-
109
-
110
-
111
-
112
-
113
-
114
-
115
-
116
 |
 |