Harman Kardon AVR 354 Owners Manual - Page 42
Recording
 |
View all Harman Kardon AVR 354 manuals
Add to My Manuals
Save this manual to your list of manuals |
Page 42 highlights
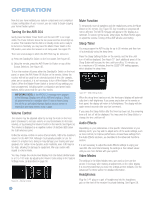
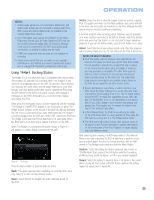
OPERATION To tune a preset station, press the ‹/ › Buttons or the I I Transport Controls, or press the Menu Button to view the list of programmed presets and scroll to the desired selection. Press the OK Button to tune the station. You may also enter the preset number using the Numeric Keys. For presets 10 through 30 press 0 before the preset number. For example, to enter preset 21, press 0-2-1. XM Radio Operation XM Radio is a satellite-delivered service that offers hundreds of program channels, as well as local traffic and weather information for select cities. The AVR 354 is an XM Ready device, which means that it is able to receive the XM service when a user-supplied XM antenna module is connected and the service activated. Select an antenna module designated for XM Ready audio components. An XM Ready-compatible module uses the special connector on the AVR 354's rear panel that allows you to use the AVR's tuner, including its 40 preset station locations and remote control. Although you may use a module with standard audio connections, which may be indicated for "car and home use," you will not be able to enjoy the AVR 354's ease of control. The XM Mini-Tuner and Home Dock (Models CNP-2000 and CNP-2000H; both pieces are required) are compatible with the AVR 354. The older Audiovox® CNP 1000 "Connect and Play" module for home audio use is also compatible, but has been discontinued and may no longer be available. Additional modules may become available in the future. Modules produced for automotive, or "mobile," use are not compatible with the AVR 354, although if they have standard analog or digital audio outputs, they may be connected to a compatible input and operated using their own controls. NOTE: To listen to XM Radio using the AVR 354, you will need to purchase an XM antenna module and subscription, and activate your module. XM service is not available in Alaska or Hawaii. Visit the XM Radio Web site at www.xmradio.com for more information. Plug the module into the XM Antenna Jack on the rear of the AVR 354. Place the antenna module so that it has a clear view through a southfacing window in order to obtain reception from the XM satellite. Select XM Radio as the source in one of these ways: 1. Press the Source List Button on the front panel repeatedly until XM Radio is selected, or use the ⁄/¤ Buttons to scroll through the source list. 2. Press the Radio Source Selector on the remote repeatedly until XM Radio is selected.. You should be able to tune in Channel 1, the Preview Channel, to confirm that your equipment is ready for activation. There are four ways to tune an XM Radio channel: 1. Use the ⁄/¤ Buttons to scan through the channel numbers. 2. Use the ‹/› Buttons to scan through any previously programmed preset stations. 3. After you have programmed presets, directly enter the preset number (1 through 40) using the Alphanumeric Keys. For single-digit positions, enter a "0" before the number. 4. Press the Menu Button to search for a channel by preset, category, all channels or direct entry. When you are able to hear Channel 1, you are ready to activate your module. If you don't hear Channel 1, make sure the module's plug is firmly seated in the XM Antenna jack, and that the module is near a south-facing window. Try unfolding the module and rotating it to obtain reception. You may need to purchase an extension cable, available on the XM Radio site, to ensure that the module is near the window. Tune to Channel 0 for a display of your antenna module's Radio ID number, required for activation. The current channel number and preset location will appear in the upper line of the Message Display, and the channel name will appear in the lower line. Three signal-strength bars will appear to the right of the channel number and preset location to indicate signal strength. The song title, artist and channel category, along with the channel number and preset position (if programmed), will all appear on screen when a video display is in use. For traffic and weather channels, the current city's name will appear instead of the channel name, and the local weather and temperature will be displayed on screen. To store a channel in one of the 40 preset locations: 1. Tune to the desired channel and press the OK Button. The lowest available preset number will flash on screen and in the front-panel Message Display. 2. Use the Alphanumeric Keys to enter the numbered preset location you wish to store the channel in, or do nothing if the current preset location is acceptable. 3. Press the OK Button to store the new preset. Recording Two-channel analog and digital audio signals, as well as composite and S-video signals, are normally available at the appropriate recording outputs. Thus, to make a recording, you need only make sure to connect your audio or video recorder to the appropriate output jacks, as described in the Installation section, insert blank media and make sure the recorder is turned on and recording while the source is playing. 42
-
 1
1 -
2
-
3
-
4
-
5
-
6
-
7
-
8
-
9
-
10
-
11
-
12
-
13
-
14
-
15
-
16
-
17
-
18
-
19
-
20
-
21
-
22
-
23
-
24
-
25
-
26
-
27
-
28
-
29
-
30
-
31
-
32
-
33
-
34
-
35
-
36
-
 37
37 -
 38
38 -
 39
39 -
 40
40 -
 41
41 -
 42
42 -
 43
43 -
 44
44 -
 45
45 -
 46
46 -
 47
47 -
48
-
49
-
50
-
51
-
52
-
53
-
54
-
55
-
56
-
57
-
58
-
59
-
60
-
61
-
62
-
63
-
64
-
65
-
66
-
67
-
68
-
69
-
70
-
71
-
72
-
73
-
74
-
75
-
76
 |
 |
