Harman Kardon AVR 354 Owners Manual - Page 51
Audio Effects - factory reset
 |
View all Harman Kardon AVR 354 manuals
Add to My Manuals
Save this manual to your list of manuals |
Page 51 highlights
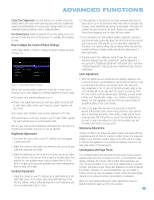
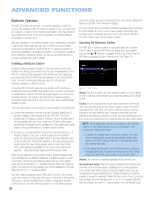
ADVANCED FUNCTIONS The best method of setting the output levels is by running the EzSet/EQ process, as described in the Initial Setup section. If any finer adjustments are desired, we recommend using the menu system to make the adjustments while playing the AVR's built-in test tone and measuring the output using an SPL meter. Less effective would be to measure the output by ear. Press the AVR Button to display the menu system, and then navigate to the Speaker Setup line. Press the OK Button to display the Speaker Setup menu. Select Manual Speaker Setup, press the OK Button, and then navigate to the Level Adjust line. Press the OK Button to display the Adjust Speaker Levels menu. See Figure 69. When you have finished adjusting the speaker levels, select the SAVE option so that the settings will not be lost. Record the level settings in Table A3 in the appendix for future reference. Audio Effects Depending on the specific characteristics of your listening room, you may wish to adjust some of the audio settings, such as tone controls, to improve performance. Access these settings from the Audio Effects menu. Press the Audio Effects Button on the front panel or remote, and the screen shown in Figure 70 will appear. The menu may also be accessed from the Setup Source menu by pressing the Info Settings Button and selecting the Audio Effects line. NOTE: The settings in the Audio Effects menu affect each source independently. Figure 69 - Adjust Speaker Levels Menu All of the speaker channels will appear with their current level settings. Reset Levels: If you wish to start by resetting all of the levels to their factory defaults of 0dB, scroll down to this line and press the OK Button. The levels will be reset. If you are using an external source to set your output levels, simply navigate to each channel, press the Set Button and use the ‹/› Buttons to adjust the level as desired between -10dB and +10dB. If you would like to set your levels using the AVR 354's internal test tone, adjust the TEST TONE line as follows. Test Tone: This line determines whether the test tone is active. To begin the process of setting the levels, press the OK Button repeatedly to select the OFF, AUTO or MANUAL setting. Any time you manually move the cursor out of the channel listings area of the screen, this setting will automatically change to OFF, stopping the test tone. When this setting reads AUTO, the test tone will automatically circulate to all channels, pausing for a few moments at each channel and then moving to the next channel several seconds later, as indicated by the highlight bar. You may adjust the level for any channel when the test tone is paused there by using the ‹/› Buttons. You may also use the ⁄/¤ Buttons at any time to move the cursor to another line, and the test tone will follow the cursor. When this setting reads MANUAL, the test tone will not move to the next channel until you use the ⁄/¤ Buttons to move it. NOTE: Setting the channel levels while one surround mode is active does not carry over to other mode groups. We recommend that after you have set the levels satisfactorily in one mode, you note the results and change to other surround modes. For those modes that don't reflect your level settings, you may either copy the settings you obtained (as a short cut), or redo the procedure to determine the correct settings. Figure 70 - Audio Effects Menu Tone Control: This setting determines whether the treble and bass controls are active. When it's off, the tone controls are "flat", with no changes. When it's on, the bass and treble frequencies are boosted or cut depending upon the tone-control settings. When an analog audio source is in use and the 2-Channel Stereo surround mode is selected, setting the Tone Control to "Off" places the unit in analog bypass mode, with no digital processing of the analog signal. Treble: Boost or cut the high frequencies by up to 10dB by using the ‹/› Buttons to change the temperature bar setting. The default setting is 0dB, at the center of the temperature bar. Bass: Boost or cut the low frequencies by up to 10dB by using the ‹/› Buttons to change the temperature bar setting. The default setting is 0dB, at the center of the temperature bar. EzSet/EQ On/Off: This setting activates or deactivates the speaker and other settings obtained when the EzSet/EQ process was run. The settings are saved for reactivation at a later listening session. LFE Trim: This setting may be used to attenuate the loudness of the subwoofer. The setting defaults to 0dB, which is the maximum. Press the ‹/› Buttons to reduce the level by up to 10dB; the setting will appear as a negative number. Night Mode: This setting is used with specially encoded Dolby Digital programs to compress the signal so that louder passages do not disturb others, while dialogue remains intelligible. • Off: For normal listening. • Half: Applies moderate compression. • Full: Applies the most compression. 51
-
 1
1 -
2
-
3
-
4
-
5
-
6
-
7
-
8
-
9
-
10
-
11
-
12
-
13
-
14
-
15
-
16
-
17
-
18
-
19
-
20
-
21
-
22
-
23
-
24
-
25
-
26
-
27
-
28
-
29
-
30
-
31
-
32
-
33
-
34
-
35
-
36
-
37
-
38
-
39
-
40
-
41
-
42
-
43
-
44
-
45
-
 46
46 -
 47
47 -
 48
48 -
 49
49 -
 50
50 -
 51
51 -
 52
52 -
 53
53 -
 54
54 -
 55
55 -
 56
56 -
57
-
58
-
59
-
60
-
61
-
62
-
63
-
64
-
65
-
66
-
67
-
68
-
69
-
70
-
71
-
72
-
73
-
74
-
75
-
76
 |
 |
