Harman Kardon AVR 645 Owners Manual - Page 19
Important Note On The Trigger Connection - sub
 |
View all Harman Kardon AVR 645 manuals
Add to My Manuals
Save this manual to your list of manuals |
Page 19 highlights
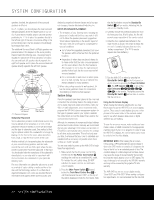
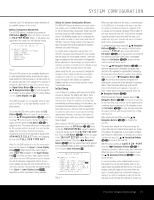
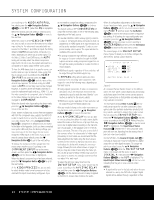
INSTALLATION AND CONNECTIONS Multiroom Audio Connections The AVR 645 is equipped with multizone capabilities that allow it to send a separate audio source to the remote zone from the one selected for use in the main room. Depending on your system's requirements, three options are available for audio connection: Option 1: Use high-quality, shielded audio interconnect cable from the AVR 645's location to the remote room. In the remote room, connect the interconnect cable to a stereo power amplifier. The amplifier will be connected to the room's speakers. At the AVR 645, plug the audio interconnect cables into the Multiroom Audio Outputs 8 on the AVR 645's rear panel. Option 2: Connect the Multiroom Audio Outputs 8 on the AVR 645 to the inputs of an optional stereo power amplifier. Run high-quality speaker wire from the amplifier to the speakers in the remote room. Option 3: Taking advantage of the AVR 645's built-in seven-channel amplifier, it is possible to use two of the amplifier channels to power speakers in the remote room. When using this option, you will not be able to use the full 7.1-channel capabilities of the AVR 645 in the main listening room, but you will be able to add another listening room without external power amplifiers. To use the internal amplifiers to power a remote zone, connect the speakers for the remote room location to the Surround Back/Multiroom Speaker Outputs fi. Before using the remote room, you will need to configure the amplifiers for surround operation by changing a setting in the MULTIROOM menu, following the instructions shown on page 46. NOTE: For all options, you may connect an optional IR sensor in the remote room to the AVR 645 via an appropriate cable. Connect the sensor's cable to the Multiroom IR Input e on the AVR 645 and use the ZR 10 remote to control the room volume. You may install an optional volume control between the output of the amplifiers and the speakers in options 1 and 2. A-BUS® Installation Connections The AVR 645 is among the few receivers available that offer built-in A-BUS/READY operation. When used with an optional A-BUS product, you have all the benefits of remote zone operation without the need for an external power amplifier. To use the AVR 645 with an approved A-BUS product, simply connect it to the AVR 645 using standard Category 5 wiring that is properly rated for the specific in-wall installation. Terminate the wiring at the receiver end to a standard RJ-45 connector in compliance with the instructions furnished with the A-BUS product. No further installation or adjustment is needed, as the A-BUS jack on the AVR 645 routes the signals to their proper destination for power, signal source and control. The output fed to the A-BUS jack is determined by the AVR 645's multiroom system and menus. RS-232 Connections The AVR 645 is equipped with an RS-232 Serial Connection Port a that may be connected to a compatible, optional, external computer, keypad or control system for bidirectional communications that enable the external system to control the AVR, and for the AVR to report status and handshake data back to the controller. Use of the RS-232 port for this type of control requires specific technical knowledge, and we recommend that any connection and programming for control be made by a trained installer or technician familiar with the equipment being used. The physical connection to the AVR 645's RS-232 port is a standard D-SUB 9 connection, but to ensure compatible and proper operation, specific software commands and pin wiring schemes may be required. USB Connections The AVR 645 is one of the few A/V receivers to offer a USB connection that may be used for both playback of compatible audio content from a computer and for loading of system updates (when available). The physical connection between a computer and the AVR is a simple one, requiring only a cable with a USB "A" type connector on one side and a USB "Mini B" on the other. Connect the larger, "A" connector on the cable to your computer or a USB hub and the end with the "Mini" USB connector to the USB Port W on the AVR's rear panel. NOTES ON USB: • The USB port on the AVR 645 is for connection to a computer, or to a hub connected to a computer, only. DO NOT connect it directly to other devices such as card readers, USB memory storage devices, external hard drives, USB accessories, digital cameras or cellular phones. Connection to these devices may cause damage to the device and/or the AVR that is not covered by the AVR's warranty. • The AVR 645's USB connection may only be used for audio playback and system upgrades. It may not be used for other purposes, such as system control, video or still-image playback. Trigger Connection The AVR 645 is equipped with a low-voltage trigger that may be used to control a wide variety of compatible, optional devices that respond to voltage actuation commands. This includes external audio power amplifiers, video screens, motorized blinds and other compatible products in a home theater or automation system. Due to the complexity of interfacing with powercontrolled devices, we strongly recommend that they be installed by a qualified professional. The trigger jack delivers 5 volts DC when activated, and remove the voltage when they are off. The connection is a 3.5mm mono mini plug with the signal on the center pin ("tip") and the outer shaft ("ring") acting as the negative or ground connection. The Trigger Output H is for use with devices such as power amplifiers that you wish to activate whenever the AVR is turned on, regardless of the input selected. After checking for voltage, current and polarity compatibility between the device being controlled and the AVR, simply connect one end of the trigger cable to the device being controlled and the other end to the Trigger Output Hon the AVR. IMPORTANT NOTE ON THE TRIGGER CONNECTION: The current draw from the trigger jack cannot exceed 1.0mA. XM Radio Connections XM Radio is a satellite-delivered, subscription-based, programming service that provides a wide range of music, sports, news and information programming with digital audio quality. The AVR 645 is XM Connect and Play-ready, which means that you can easily add the XM service to your home audio system by purchasing an XM antenna module or Passport system, activating an account with XM and then making a simple, singlecable connection to your AVR. To purchase an XM antenna module or Passport system, consult your dealer, or contact XM Radio at www.xmradio.com. After following the instructions packed with the module, place the XM antenna near a south-facing window and run the cable to the AVR. Connect the plug at the end of the cable to the XMReady Module Input V. If you are using an XM Passport system, remember that the Passport card must be inserted for the system to operate. Once the connection is made, follow the instructions on page 41 for more information on listening to XM Radio. NOTES on XM Radio: • XM Radio requires the purchase of additional, optional hardware and a separate subscription to the XM service. • XM Radio is available only in the continental United States and Canada. It is not available in Alaska or Hawaii. • XM reception requires that the antenna be able to "see" the XM satellites or receive a signal from one of the XM ground-based repeaters. Depending on your installation and location, XM service may not be available in some areas. AC Power Connections This unit is equipped with an accessory AC outlet that may be used to power accessory devices, but it should not be used with high-current draw equipment such as power amplifiers. The total power draw may not exceed 100 watts. INSTALLATION AND CONNECTIONS 19
-
 1
1 -
2
-
3
-
4
-
5
-
6
-
7
-
8
-
9
-
10
-
11
-
12
-
13
-
 14
14 -
 15
15 -
 16
16 -
 17
17 -
 18
18 -
 19
19 -
 20
20 -
 21
21 -
 22
22 -
 23
23 -
 24
24 -
25
-
26
-
27
-
28
-
29
-
30
-
31
-
32
-
33
-
34
-
35
-
36
-
37
-
38
-
39
-
40
-
41
-
42
-
43
-
44
-
45
-
46
-
47
-
48
-
49
-
50
-
51
-
52
-
53
-
54
-
55
-
56
-
57
-
58
-
59
-
60
-
61
-
62
-
63
-
64
-
65
-
66
-
67
-
68
 |
 |
