Harman Kardon AVR 645 Owners Manual - Page 25
Video Monitor Settings, Audio Setup, Surround Setup
 |
View all Harman Kardon AVR 645 manuals
Add to My Manuals
Save this manual to your list of manuals |
Page 25 highlights
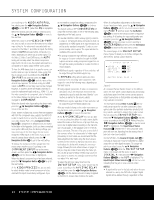
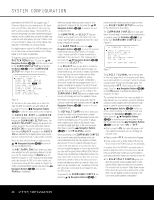
SYSTEM CONFIGURATION format, and which digital input (optical or coax) they are fed from. Analog signals are not converted to digital, and their format (e.g., PCM, Dolby Digital or DTS) may not be changed. • Selection of the front-panel jacks as outputs will remain effective as long as the AVR 645 is on. Once the unit is turned off, the jacks will revert to their normal use as inputs when the unit is turned on again. The REC OUT line enables you to select what the audio output is at the analog record outputs for the input source being configured. Press the ‹/› Navigation Buttons D© to choose one of the following if you wish to change the default setting: • ANALOG selects an unprocessed pass-through of an analog source and is the default setting for most inputs. • DSP DOWNMIX selects a two-channel downmix of a multichannel digital input. • In a few rare cases, a video display may not be able to accept 480i video input signals over the HDMI connection. When this occurs you will see a message alerting you to turn off the HDMI connection between the AVR and your video display. You may do that by pressing the Set Button pœ to accept the suggested setting of OFF while the message is shown, or you may turn the HDMI communications link off here by pressing the ⁄/¤ Navigation Buttons D© so that OFF is highlighted. Most video displays do not require a change to this setting; we recommend that you use the factory default setting unless the warning appears. When all settings on this page are complete, press the ⁄/¤ Navigation Buttons D© until the onscreen cursor is pointing to PAGE 1 and then press the Set Button pœ to return to the main IN/OUT SETUP menu to configure another input, or if no further input configuration adjustments are needed, press the ⁄/¤ Navigation Buttons D© until the on-screen cursor is pointing to MASTER MENU and then press the Set Button pœ to return to the main menu screen. Video Monitor Settings The VIDEO MONITOR SETTINGS menu (Figure 4) is unique in that it contains a mix of information display lines that detail status information about the AVR 645's video system settings, along with a few lines where a specific parameter may be changed. With the MASTER MENU on the screen, press the ⁄/¤ Navigation Buttons D © until the on-screen cursor is pointing to VIDEO MONITOR SETTINGS and then press the Set Button pœ to move to the menu screen. *VIDEO MONITOR SETTINGS* IN VIDEO FORMAT: 1080i IN VIDEO COPY PROT: ON VIDEO PROCESS: V CONVER COMPONENT OUT: OFF S-VIDEO OUT: OFF COMPOSITE OUT: OFF ➔ DISPLAY INTER: HDMI/DVI HDMI AUDIO OUT: NO BACK TO MASTER MENU Figure 4 The IN VIDEO FORMAT line is an informational display of the resolution of the incoming video stream, and may not be adjusted. The IN VIDEO COPY PROT line is an informational display that shows whether or not an incoming video signal contains copy protection encoding, and may not be adjusted. The VIDEO PROCESS line is an informational display of the setting made in the IN/OUT SETUP menu indicating how incoming video is processed for the input being viewed, and may not be adjusted. The COMPONENT OUT line is an informational display of whether or not the Composite Video outputs are ENABLED or OFF, based on the input signal type and resolution, and whether or not the incoming video signal has HDCP content protection. It may not be adjusted. The S-VIDEO OUT line is an informational display of whether or not the S-video outputs are available at a 480i resolution (or OFF), based on the input signal type and resolution and whether or not the incoming video signal has HDCP content protection. It may not be adjusted. The DISPLAY INTER line allows you to choose between an ANALOG video output default value and an HDMI/DVI output by pressing the ‹/› Navigation Buttons D© to make the desired selection. When the setting is ANALOG, the HDMI output is placed in a Standby mode so that it automatically switches to HDMI when an HDMI signal is detected. If a high-definition input source is not HDCP-content-protected, it may be output through the component jacks; otherwise, it will be sent only to the HDMI outputs. The HDMI/DVI setting routes all converted or processed video to the HDMI outputs. The HDMI AUDIO OUT line allows you to choose whether a two-channel downmix of the audio that accompanies the selected source is sent over the HDMI connection (YES) at the maximum bit rate the display's audio system is capable of handling, or not (NO). To change the setting, press the ‹/› Navigation Buttons D© to make the desired selection. When required adjustments have been made for this input, or if no adjustment is required, press the ⁄/¤ Navigation Buttons D© until the on-screen cursor is pointing to BACK TO MASTER MENU and then press the Set Button pœ to return to the main menu screen. Audio Setup This menu allows you to configure the tone controls. If you do not wish to change any of those settings at this time, proceed to the next menu screen. To make configuration changes to those parameters, first make certain that the MASTER MENU is on screen with the cursor pointing to the AUDIO SETUP line, and press the Set Button pœ. The AUDIO SETUP menu (Figure 5) will appear. * AUDIO SETUP * →TONE BASS TREBLE :IN :0 :0 OUT BACK TO MASTER MENU Figure 5 The first line controls whether or not the bass/treble tone controls are in the signal path. The normal default is for them to be in-line, but if you wish to remove them from the circuit for "flat" response, first make certain that the cursor is pointing to the TONE line on the menu and press the ‹/› Navigation Buttons D© so that OUT is highlighted. If you wish to leave the tone controls in the signal path, the amount off boost or cut for bass and treble may be adjusted up to ±12dB in 2dB steps by pressing the ⁄/¤ Navigation Buttons D© so that the cursor is next to BASS or TREBLE, depending on which setting you wish to adjust. Next, press the ‹/› Navigation Buttons D© until the desired setting is shown. When all desired changes have been made on this menu, press the ⁄/¤ Navigation Buttons D© so that the cursor is next to the BACK TO MASTER MENU line; press the Set Button pœ. Surround Setup The next step is to set the surround mode you wish to use with the input that was previously selected in the IN/OUT SETUP menu. Since surround modes are a matter of personal taste, feel free to select any mode you wish - you may change it later. However, to make it easier to establish the initial SYSTEM CONFIGURATION 25
-
 1
1 -
2
-
3
-
4
-
5
-
6
-
7
-
8
-
9
-
10
-
11
-
12
-
13
-
14
-
15
-
16
-
17
-
18
-
19
-
 20
20 -
 21
21 -
 22
22 -
 23
23 -
 24
24 -
 25
25 -
 26
26 -
 27
27 -
 28
28 -
 29
29 -
 30
30 -
31
-
32
-
33
-
34
-
35
-
36
-
37
-
38
-
39
-
40
-
41
-
42
-
43
-
44
-
45
-
46
-
47
-
48
-
49
-
50
-
51
-
52
-
53
-
54
-
55
-
56
-
57
-
58
-
59
-
60
-
61
-
62
-
63
-
64
-
65
-
66
-
67
-
68
 |
 |