HP 5100 HP LaserJet 5100 Series - Printer Maintenance Kit - Page 23
Step 7 Replace the optional 500-sheet tray separation roller
 |
UPC - 808736092500
View all HP 5100 manuals
Add to My Manuals
Save this manual to your list of manuals |
Page 23 highlights
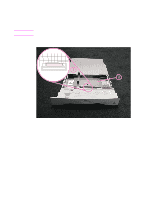
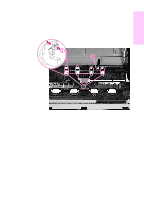
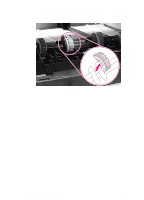
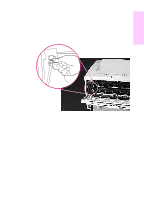
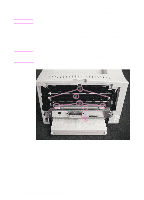
English Step 7 Replace the optional 500-sheet tray separation roller Note If no optional 500-sheet tray is installed in the printer, skip this step and go to "Replace the fuser" on page 22. 1 With one hand, lift the return cover (Figure 15, item 2). 2 With the other hand, pinch the separation roller tab (item 1), and slide the separation roller off of the shaft and remove. Figure 15 Removing the separation roller ENWW Replace the optional 500-sheet tray separation roller 21
-
 1
1 -
2
-
3
-
4
-
5
-
6
-
7
-
8
-
9
-
10
-
11
-
12
-
13
-
14
-
15
-
16
-
17
-
 18
18 -
 19
19 -
 20
20 -
 21
21 -
 22
22 -
 23
23 -
 24
24 -
 25
25 -
 26
26 -
 27
27 -
 28
28 -
29
-
30
-
31
-
32
-
33
-
34
-
35
-
36
-
37
-
38
-
39
-
40
-
41
-
42
-
43
-
44
-
45
-
46
-
47
-
48
-
49
-
50
-
51
-
52
-
53
-
54
-
55
-
56
-
57
-
58
-
59
-
60
-
61
-
62
-
63
-
64
-
65
-
66
-
67
-
68
-
69
-
70
-
71
-
72
-
73
-
74
-
75
-
76
-
77
-
78
-
79
-
80
-
81
-
82
-
83
-
84
-
85
-
86
-
87
-
88
-
89
-
90
-
91
-
92
-
93
-
94
-
95
-
96
-
97
-
98
-
99
-
100
-
101
-
102
-
103
-
104
-
105
-
106
-
107
-
108
-
109
-
110
-
111
-
112
-
113
-
114
-
115
-
116
-
117
-
118
-
119
-
120
-
121
-
122
-
123
-
124
-
125
-
126
-
127
-
128
-
129
-
130
-
131
-
132
-
133
-
134
-
135
-
136
-
137
-
138
-
139
-
140
-
141
-
142
-
143
-
144
-
145
-
146
-
147
-
148
-
149
-
150
-
151
-
152
-
153
-
154
-
155
-
156
-
157
-
158
-
159
-
160
-
161
-
162
-
163
-
164
-
165
-
166
-
167
-
168
-
169
-
170
-
171
-
172
-
173
-
174
-
175
-
176
-
177
-
178
-
179
-
180
-
181
-
182
-
183
-
184
-
185
-
186
 |
 |

ENWW
Replace the optional 500-sheet tray separation roller
21
English
Step 7
Replace the optional 500-sheet tray
separation roller
Note
If no optional 500-sheet tray is installed in the printer, skip this step and
go to “Replace the fuser” on page 22.
1
With one hand, lift the return cover (Figure 15, item 2).
2
With the other hand, pinch the separation roller tab (item 1), and
slide the separation roller off of the shaft and remove.
Figure 15
Removing the separation roller