HP Dc5700 Hardware Reference Guide - dc5700 MT - Page 35
Removing an Internal 3.5-inch Hard Drive, CAUTION, - restore cd
 |
UPC - 882780819535
View all HP Dc5700 manuals
Add to My Manuals
Save this manual to your list of manuals |
Page 35 highlights
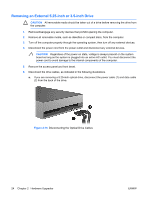
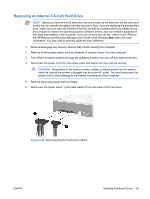
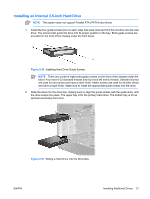
Removing an Internal 3.5-inch Hard Drive NOTE Before you remove the old hard drive, be sure to back up the data from the old hard drive so that you can transfer the data to the new hard drive. Also, if you are replacing the primary hard drive, make sure you have the Restore Plus! CD set that you created when you initially set up the computer to restore the operating system, software drivers, and any software applications that were preinstalled on the computer. If you do not have this CD set, create it now. Refer to the HP Backup and Recovery Manager User Guide in the Windows Start menu for more information. You may wish to print this guide for easy reference. 1. Remove/disengage any security devices that prohibit opening the computer. 2. Remove all removable media, such as diskettes or compact discs, from the computer. 3. Turn off the computer properly through the operating system, then turn off any external devices. 4. Disconnect the power cord from the power outlet and disconnect any external devices. CAUTION Regardless of the power-on state, voltage is always present on the system board as long as the system is plugged into an active AC outlet. You must disconnect the power cord to avoid damage to the internal components of the computer. 5. Remove the access panel and front bezel. 6. Disconnect the power cable (1) and data cable (2) from the back of the hard drive. Figure 2-23 Disconnecting the Hard Drive Cables ENWW Installing Additional Drives 29
-
 1
1 -
2
-
3
-
4
-
5
-
6
-
7
-
8
-
9
-
10
-
11
-
12
-
13
-
14
-
15
-
16
-
17
-
18
-
19
-
20
-
21
-
22
-
23
-
24
-
25
-
26
-
27
-
28
-
29
-
 30
30 -
 31
31 -
 32
32 -
 33
33 -
 34
34 -
 35
35 -
 36
36 -
 37
37 -
 38
38 -
 39
39 -
 40
40 -
41
-
42
-
43
-
44
-
45
-
46
-
47
-
48
-
49
-
50
-
51
-
52
 |
 |
