HP Dv71270us Service Guide - Page 97
Top cover see
 |
UPC - 884420712770
View all HP Dv71270us manuals
Add to My Manuals
Save this manual to your list of manuals |
Page 97 highlights
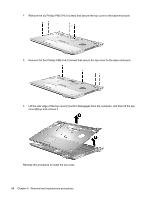
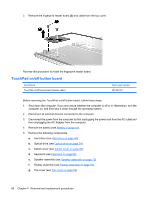
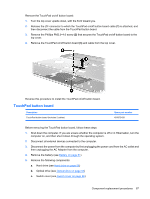
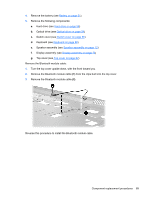
4. Remove the battery (see Battery on page 51). 5. Remove the following components: a. Hard drive (see Hard drive on page 56) b. Optical drive (see Optical drive on page 54) c. Switch cover (see Switch cover on page 66) d. Keyboard (see Keyboard on page 68) e. Speaker assembly (see Speaker assembly on page 72) f. Display assembly (see Display assembly on page 73) g. Top cover (see Top cover on page 82) Remove the Bluetooth module cable: 1. Turn the top cover upside down, with the front toward you. 2. Remove the Bluetooth module cable (1) from the clips built into the top cover. 3. Remove the Bluetooth module cable (2). Reverse this procedure to install the Bluetooth module cable. Component replacement procedures 89
-
 1
1 -
2
-
3
-
4
-
5
-
6
-
7
-
8
-
9
-
10
-
11
-
12
-
13
-
14
-
15
-
16
-
17
-
18
-
19
-
20
-
21
-
22
-
23
-
24
-
25
-
26
-
27
-
28
-
29
-
30
-
31
-
32
-
33
-
34
-
35
-
36
-
37
-
38
-
39
-
40
-
41
-
42
-
43
-
44
-
45
-
46
-
47
-
48
-
49
-
50
-
51
-
52
-
53
-
54
-
55
-
56
-
57
-
58
-
59
-
60
-
61
-
62
-
63
-
64
-
65
-
66
-
67
-
68
-
69
-
70
-
71
-
72
-
73
-
74
-
75
-
76
-
77
-
78
-
79
-
80
-
81
-
82
-
83
-
84
-
85
-
86
-
87
-
88
-
89
-
90
-
91
-
 92
92 -
 93
93 -
 94
94 -
 95
95 -
 96
96 -
 97
97 -
 98
98 -
 99
99 -
 100
100 -
 101
101 -
 102
102 -
103
-
104
-
105
-
106
-
107
-
108
-
109
-
110
-
111
-
112
-
113
-
114
-
115
-
116
-
117
-
118
-
119
-
120
-
121
-
122
-
123
-
124
-
125
-
126
-
127
-
128
-
129
-
130
-
131
-
132
-
133
-
134
-
135
-
136
-
137
-
138
-
139
-
140
-
141
-
142
-
143
-
144
-
145
-
146
-
147
-
148
-
149
-
150
-
151
-
152
-
153
-
154
-
155
-
156
-
157
-
158
-
159
-
160
-
161
-
162
-
163
-
164
-
165
-
166
-
167
-
168
-
169
-
170
-
171
-
172
-
173
-
174
-
175
-
176
-
177
-
178
-
179
-
180
-
181
 |
 |
4.
Remove the battery (see
Battery
on page
51
).
5.
Remove the following components:
a.
Hard drive (see
Hard drive
on page
56
)
b.
Optical drive (see
Optical drive
on page
54
)
c.
Switch cover (see
Switch cover
on page
66
)
d.
Keyboard (see
Keyboard
on page
68
)
e.
Speaker assembly (see
Speaker assembly
on page
72
)
f.
Display assembly (see
Display assembly
on page
73
)
g.
Top cover (see
Top cover
on page
82
)
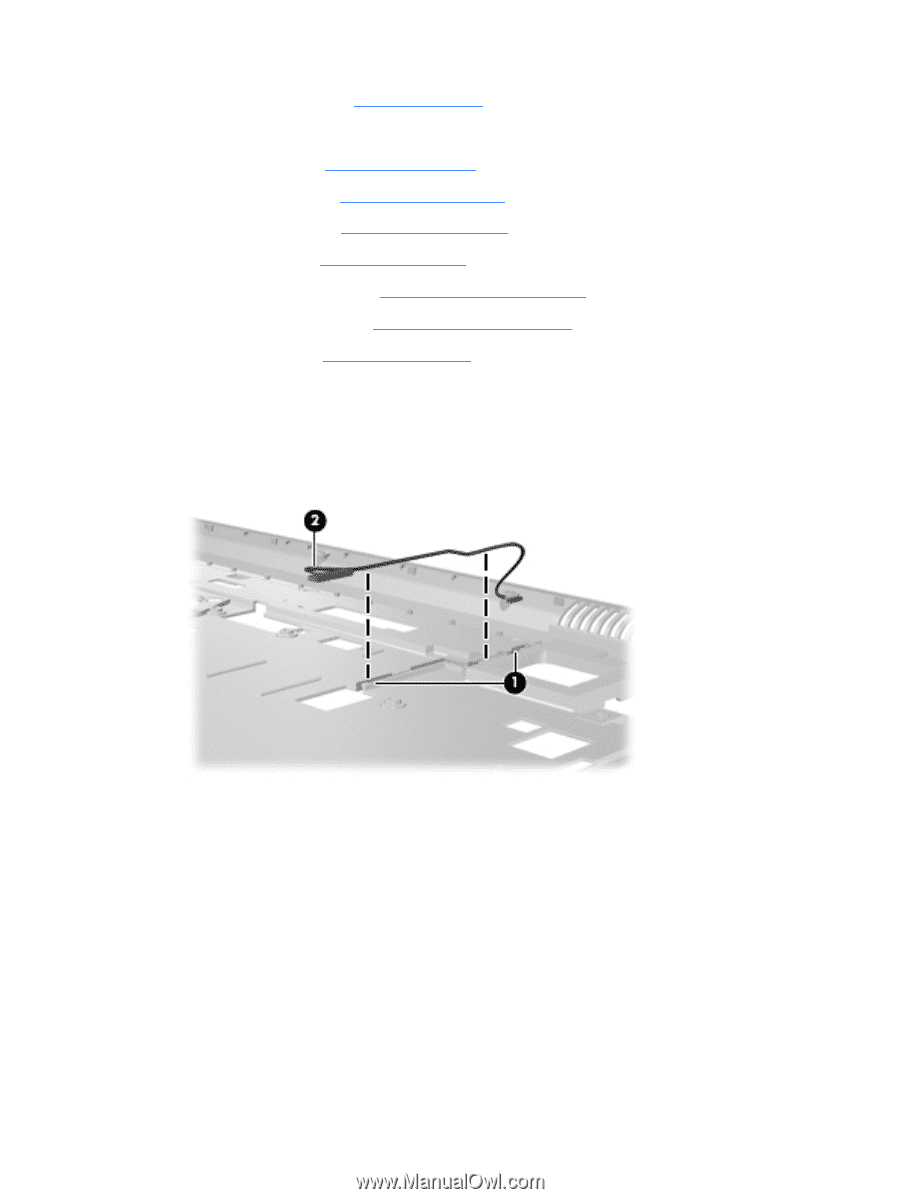
Remove the Bluetooth module cable:
1.
Turn the top cover upside down, with the front toward you.
2.
Remove the Bluetooth module cable
(1)
from the clips built into the top cover.
3.
Remove the Bluetooth module cable
(2)
.
Reverse this procedure to install the Bluetooth module cable.
Component replacement procedures
89