HP EliteBook 700 Maintenance and Service Guide - Page 45
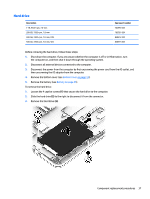
Use a case utility tool to release the rear edge, Remove the bottom cover
 |
View all HP EliteBook 700 manuals
Add to My Manuals
Save this manual to your list of manuals |
Page 45 highlights
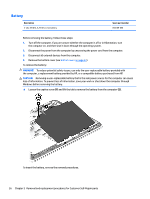
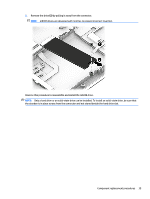
4. Remove the 11 Phillips PM2.5×5.0 screws that secure the bottom cover to the computer in the (1) through (11) sequence indicated in the following image. 5. Remove the PM2.0×7.0 screw (1) in the SD card slot that secures the bottom cover to the computer. 6. Use a case utility tool to release the rear edge (2) of the bottom cover. 7. Remove the bottom cover (3). Reverse the removal procedures to install the bottom cover. Component replacement procedures 35
-
 1
1 -
2
-
3
-
4
-
5
-
6
-
7
-
8
-
9
-
10
-
11
-
12
-
13
-
14
-
15
-
16
-
17
-
18
-
19
-
20
-
21
-
22
-
23
-
24
-
25
-
26
-
27
-
28
-
29
-
30
-
31
-
32
-
33
-
34
-
35
-
36
-
37
-
38
-
39
-
 40
40 -
 41
41 -
 42
42 -
 43
43 -
 44
44 -
 45
45 -
 46
46 -
 47
47 -
 48
48 -
 49
49 -
 50
50 -
51
-
52
-
53
-
54
-
55
-
56
-
57
-
58
-
59
-
60
-
61
-
62
-
63
-
64
-
65
-
66
-
67
-
68
-
69
-
70
-
71
-
72
-
73
-
74
-
75
-
76
-
77
-
78
-
79
-
80
-
81
-
82
-
83
-
84
-
85
-
86
-
87
-
88
-
89
-
90
-
91
-
92
-
93
-
94
-
95
-
96
-
97
-
98
-
99
-
100
-
101
 |
 |

4.
Remove the 11 Phillips PM2.5×5.0 screws that secure the bottom cover to the computer in the
(1)
through
(11)
sequence indicated in the following image.
5.
Remove the PM2.0×7.0 screw
(1)
in the SD card slot that secures the bottom cover to the computer.
6.
Use a case utility tool to release the rear edge
(2)
of the bottom cover.
7.
Remove the bottom cover
(3)
.
Reverse the removal procedures to install the bottom cover.
Component replacement procedures
35