HP Mini CQ10-100 Compaq Mini CQ10 Notebook PC and Compaq Mini 102 Notebook PC - Page 77
the adhesive, that secures them to the display enclosure, and then remove the cables
 |
View all HP Mini CQ10-100 manuals
Add to My Manuals
Save this manual to your list of manuals |
Page 77 highlights
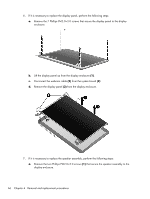
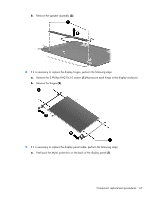
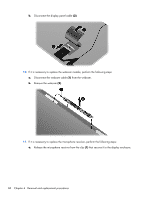
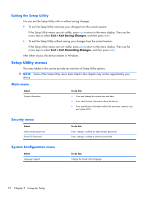
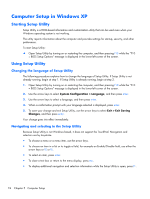
b. Pull the receiver through the tabs (2), and remove the microphone receiver (3). 12. If it is necessary to replace the wireless antenna transceivers and cables, detach the cables from the adhesive (1) that secures them to the display enclosure, and then remove the cables (2). Reverse this procedure to reassemble and install the display assembly. Component replacement procedures 69
-
 1
1 -
2
-
3
-
4
-
5
-
6
-
7
-
8
-
9
-
10
-
11
-
12
-
13
-
14
-
15
-
16
-
17
-
18
-
19
-
20
-
21
-
22
-
23
-
24
-
25
-
26
-
27
-
28
-
29
-
30
-
31
-
32
-
33
-
34
-
35
-
36
-
37
-
38
-
39
-
40
-
41
-
42
-
43
-
44
-
45
-
46
-
47
-
48
-
49
-
50
-
51
-
52
-
53
-
54
-
55
-
56
-
57
-
58
-
59
-
60
-
61
-
62
-
63
-
64
-
65
-
66
-
67
-
68
-
69
-
70
-
71
-
 72
72 -
 73
73 -
 74
74 -
 75
75 -
 76
76 -
 77
77 -
 78
78 -
 79
79 -
 80
80 -
 81
81 -
 82
82 -
83
-
84
-
85
-
86
-
87
-
88
-
89
-
90
-
91
-
92
-
93
-
94
-
95
-
96
-
97
-
98
-
99
-
100
-
101
-
102
-
103
-
104
-
105
-
106
-
107
-
108
-
109
-
110
-
111
-
112
-
113
-
114
-
115
-
116
-
117
-
118
-
119
 |
 |
b.
Pull the receiver through the tabs
(2)
, and remove the microphone receiver
(3)
.
12.
If it is necessary to replace the wireless antenna transceivers and cables, detach the cables from
the adhesive
(1)
that secures them to the display enclosure, and then remove the cables
(2)
.
Reverse this procedure to reassemble and install the display assembly.
Component replacement procedures
69