HP Pavilion Elite e9100 Upgrade and Service - Page 43
Insert and tighten the two screws that secure the cage, in the computer.
 |
View all HP Pavilion Elite e9100 manuals
Add to My Manuals
Save this manual to your list of manuals |
Page 43 highlights
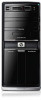
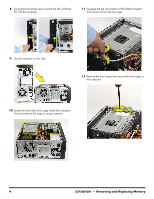
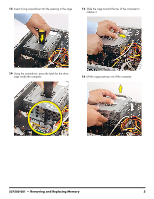
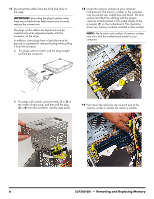
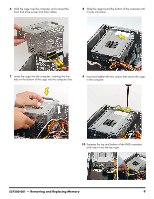
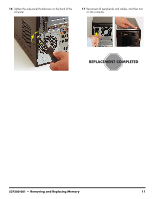
6 Hold the cage over the computer, and connect the hard disk drive power and data cables. 8 Slide the cage toward the bottom of the computer until it locks into place. 7 Lower the cage into the computer, inserting the four tabs on the bottom of the cage into the computer slots. 9 Insert and tighten the two screws that secure the cage in the computer. 10 Squeeze the top and bottom of the PMD connector and insert it into the top cage. 537500-001 - Removing and Replacing Memory 9
-
 1
1 -
2
-
3
-
4
-
5
-
6
-
7
-
8
-
9
-
10
-
11
-
12
-
13
-
14
-
15
-
16
-
17
-
18
-
19
-
20
-
21
-
22
-
23
-
24
-
25
-
26
-
27
-
28
-
29
-
30
-
31
-
32
-
33
-
34
-
35
-
36
-
37
-
 38
38 -
 39
39 -
 40
40 -
 41
41 -
 42
42 -
 43
43 -
 44
44 -
 45
45 -
 46
46
 |
 |

537500-001
— Removing and Replacing Memory
9
6
Hold the cage over the computer, and connect the
hard disk drive power and data cables.
7
Lower the cage into the computer, inserting the four
tabs on the bottom of the cage into the computer slots.
8
Slide the cage toward the bottom of the computer until
it locks into place.
9
Insert and tighten the two screws that secure the cage
in the computer.
10
Squeeze the top and bottom of the PMD connector
and insert it into the top cage.