HP Photosmart A430 User Guide - A430 Series - Page 20
Print basics, Dock your camera - usb cable
 |
View all HP Photosmart A430 manuals
Add to My Manuals
Save this manual to your list of manuals |
Page 20 highlights
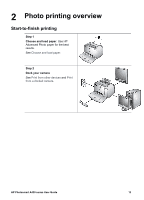
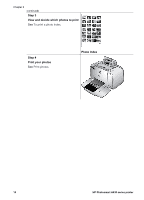
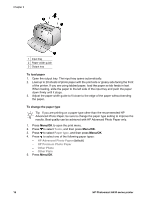
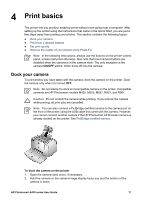
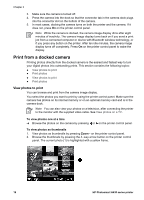
4 Print basics The printer lets you produce amazing prints without even going near a computer. After setting up the printer using the instructions that came in the Quick Start, you are just a few steps away from printing your photos. This section contains the following topics: ● Dock your camera ● Print from a docked camera ● Set print quality ● Improve the quality of your photos using Photo Fix Note In the following instructions, always use the buttons on the printer control panel, unless instructed otherwise. Also note that most camera buttons are disabled when the camera is in the camera dock. The only exception is the camera ON/OFF switch, which turns off only the camera. Dock your camera To print photos you have taken with the camera, dock the camera on the printer. Dock the camera only when it is turned OFF. Note Do not attempt to dock an incompatible camera on the printer. Compatible cameras are HP Photosmart models M425, M525, M627, R827, and R967. Caution Do not undock the camera while printing. If you undock the camera while printing, all print jobs are cancelled. Note You can also connect a PictBridge-certified camera to the camera port on the front of the printer using the USB cable that came with the camera. However, you cannot connect another camera if the HP Photosmart A430 series camera is already docked on the printer. See PictBridge-certified camera. To dock the camera on the printer 1. Open the camera dock cover, if necessary. 2. Hold the camera so the camera image display faces you and the bottom of the camera is down. HP Photosmart A430 series User Guide 17
-
 1
1 -
2
-
3
-
4
-
5
-
6
-
7
-
8
-
9
-
10
-
11
-
12
-
13
-
14
-
 15
15 -
 16
16 -
 17
17 -
 18
18 -
 19
19 -
 20
20 -
 21
21 -
 22
22 -
 23
23 -
 24
24 -
 25
25 -
26
-
27
-
28
-
29
-
30
-
31
-
32
-
33
-
34
-
35
-
36
-
37
-
38
-
39
-
40
-
41
-
42
-
43
-
44
-
45
-
46
-
47
-
48
-
49
-
50
-
51
-
52
-
53
-
54
-
55
-
56
-
57
-
58
-
59
-
60
-
61
-
62
 |
 |