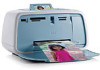
HP Photosmart A520 User Guide - Page 30
Change the paper size, Resize a photo, Use advanced color settings
 |
View all HP Photosmart A520 manuals
Add to My Manuals
Save this manual to your list of manuals |
Page 30 highlights
Change the paper size Use the Printer Properties dialog box instead of the software application's Page Setup dialog box to select a paper size. Some software applications do not list all the paper sizes the printer supports. To select a paper size 1. Open the Printer Properties dialog box. For more information, see "Printer Properties dialog box" on page 23. 2. Click the Features tab. 3. Select a paper size from the Size drop-down list. For borderless printing, select a borderless paper size, or select a paper size, then click the Borderless check box. 4. Select any other print settings that you want, and then click OK. Resize a photo Use the printer software to print a photo that is formatted for one paper size on another paper size. Doing this can be useful if you do not have the correct paper size available. To resize a photo for a different paper size 1. Open the Printer Properties dialog box. For more information, see "Printer Properties dialog box" on page 23. 2. Click the Features tab. 3. Click Scale to paper size, and then select the target paper size in the drop-down list. The target paper size is the size of the paper on which you are printing, not the size for which the document was formatted. 4. Select any other print settings that you want, and then click OK. Use advanced color settings Use the More color options dialog box to adjust how printed colors appear. Adjusting these settings causes the printed colors to differ from the colors that appear on the computer monitor. These settings do not affect the original photo; they only affect how it prints. Follow these steps to specify advanced color settings: To specify advanced color settings 1. Open the Printer Properties dialog box. For more information, see "Printer Properties dialog box" on page 23. 2. Click the Color tab, and then click the More color options button. The More color options dialog box is displayed. Change the print settings for the print job 29
-
 1
1 -
2
-
3
-
4
-
5
-
6
-
7
-
8
-
9
-
10
-
11
-
12
-
13
-
14
-
15
-
16
-
17
-
18
-
19
-
20
-
21
-
22
-
23
-
24
-
 25
25 -
 26
26 -
 27
27 -
 28
28 -
 29
29 -
 30
30 -
 31
31 -
 32
32 -
 33
33 -
 34
34 -
 35
35 -
36
-
37
-
38
-
39
-
40
-
41
-
42
-
43
-
44
-
45
-
46
-
47
-
48
-
49
-
50
-
51
-
52
-
53
-
54
-
55
-
56
-
57
-
58
-
59
-
60
-
61
-
62
-
63
-
64
-
65
-
66
-
67
-
68
-
69
-
70
-
71
-
72
 |
 |
