HP Smart Tank 7300 User Guide - Page 75
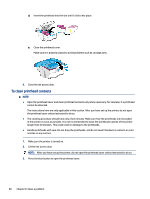
To verify the printheads are installed properly, Remove and reinsert the printhead.
 |
View all HP Smart Tank 7300 manuals
Add to My Manuals
Save this manual to your list of manuals |
Page 75 highlights
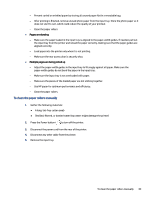
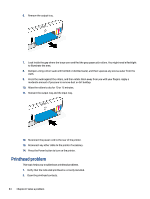
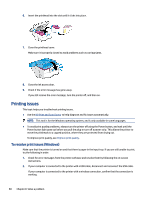
3. Contact HP support for assistance. Go to hp.com/support. To verify the printheads are installed properly NOTE: ● The instructions here are only applicable in this section. After you have set up the printer, do not open the printhead cover unless instructed to do so. ● Handle printheads with care. Do not drop the printheads, and do not touch the electric contacts or print nozzles on any surface. 1. Make sure the printer is turned on. 2. Lift the ink access door. Wait for the print carriage to move to the center and stop. NOTE: After you have set up the printer, do not open the printhead cover unless instructed to do so. 3. Remove and reinsert the printhead. a. Press the blue button to open the printhead cover. b. Remove the printhead from the carriage. c. If you find any orange cap or tape on the printhead, remove it. CAUTION: Do not touch the electric contacts or print nozzles. To verify the printheads are installed properly 65
-
 1
1 -
2
-
3
-
4
-
5
-
6
-
7
-
8
-
9
-
10
-
11
-
12
-
13
-
14
-
15
-
16
-
17
-
18
-
19
-
20
-
21
-
22
-
23
-
24
-
25
-
26
-
27
-
28
-
29
-
30
-
31
-
32
-
33
-
34
-
35
-
36
-
37
-
38
-
39
-
40
-
41
-
42
-
43
-
44
-
45
-
46
-
47
-
48
-
49
-
50
-
51
-
52
-
53
-
54
-
55
-
56
-
57
-
58
-
59
-
60
-
61
-
62
-
63
-
64
-
65
-
66
-
67
-
68
-
69
-
 70
70 -
 71
71 -
 72
72 -
 73
73 -
 74
74 -
 75
75 -
 76
76 -
 77
77 -
 78
78 -
 79
79 -
 80
80 -
81
-
82
-
83
-
84
-
85
-
86
-
87
-
88
-
89
-
90
-
91
-
92
-
93
-
94
-
95
-
96
-
97
-
98
-
99
-
100
-
101
-
102
-
103
-
104
 |
 |
