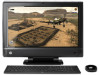
HP TouchSmart 610-1150xt Upgrading and Servicing Guide
HP TouchSmart 610-1150xt Manual
 |
View all HP TouchSmart 610-1150xt manuals
Add to My Manuals
Save this manual to your list of manuals |
HP TouchSmart 610-1150xt manual content summary:
- HP TouchSmart 610-1150xt | Upgrading and Servicing Guide - Page 1
UPGRADING AND SERVICING GUIDE HPTouchSmart610 PC Computer features may vary by model. Removing and Replacing a CD/DVD Drive .......2 Removing the CD/DVD Drive 2 Installing a New CD/DVD Drive 5 Removing and Replacing a Hard Disk Drive ....9 Removing the Hard Disk Drive 9 Installing a New Hard Disk - HP TouchSmart 610-1150xt | Upgrading and Servicing Guide - Page 2
ii 647642-001 - HP TouchSmart 610-1150xt | Upgrading and Servicing Guide - Page 3
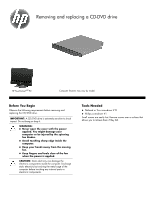
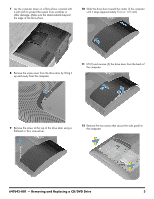
and replacing a CD-DVD drive HP TouchSmart610 PC Computer features may vary by model. Before You Begin Observe the following requirements before removing and replacing the CD/DVD drive. IMPORTANT: A CD/DVD drive is extremely sensitive to shock impact. Do not bang or drop it. WARNING: Never - HP TouchSmart 610-1150xt | Upgrading and Servicing Guide - Page 4
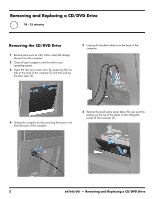
of the computer. 4 Unplug the computer by disconnecting the power cord from the back of the computer. 6 Remove the small center panel below the rear ports by pulling out the top of the panel (1) then lifting the panel off the computer (2). 2 647642-001 - Removing and Replacing a CD/DVD Drive - HP TouchSmart 610-1150xt | Upgrading and Servicing Guide - Page 5
the computer. 11 Lift (1) and remove (2) the drive door from the back of the computer. 9 Remove the screw at the top of the drive door using a flathead or Torx screwdriver. 12 Remove the two screws that secure the side panel to the computer. 647642-001 - Removing and Replacing a CD/DVD Drive 3 - HP TouchSmart 610-1150xt | Upgrading and Servicing Guide - Page 6
computer. 16 Push the CD-DVD drive out of the computer. 14 Remove the side panel from the computer. 17 Remove the CD-DVD drive from the computer. 15 Loosen the captive screw on the top of the CD-DVD drive. 18 Remove the bracket on the back of the CD/DVD tray by - HP TouchSmart 610-1150xt | Upgrading and Servicing Guide - Page 7
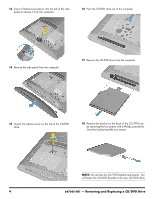
DVD drive into the slot on the computer. 5 Reinstall the side panel on the side of the computer, aligning the screw holes on the panel with the screw holes on the computer. Press firmly on the center of the side panel until it snaps into place. 647642-001 - Removing and Replacing a CD/DVD Drive 5 - HP TouchSmart 610-1150xt | Upgrading and Servicing Guide - Page 8
6 Install the two screws that secure the side panel to the computer. 9 Install the screw securing the door to the back of the computer. 7 Reinstall the drive door to the screw hole on the computer. 11 Place the computer in an upright position. 6 647642-001 - Removing and Replacing a CD/DVD Drive - HP TouchSmart 610-1150xt | Upgrading and Servicing Guide - Page 9
computer. 15 Close the rear port access door at the back of the computer. 13 Reconnect all the cables at the back of the computer. 16 Press the power button to turn on the computer. 14 Plug the power cord into the back of the computer. 647642-001 - Removing and Replacing a CD - HP TouchSmart 610-1150xt | Upgrading and Servicing Guide - Page 10
and replacing a Hard Disk Drive HP TouchSmart610 PC Computer features may vary by model. Before You Begin Observe the following requirements before removing and replacing the hard disk drive. IMPORTANT: A hard disk drive is extremely sensitive to shock impact. Do not bang or drop it. Do not - HP TouchSmart 610-1150xt | Upgrading and Servicing Guide - Page 11
pulling the door open (2). 5 Unplug all attached cables from the back of the computer. 6 Remove the small center panel below the rear ports by pulling out the top of the panel (1) then lifting the panel off the computer (2). 4 Unplug the computer by disconnecting the power cord from the back of - HP TouchSmart 610-1150xt | Upgrading and Servicing Guide - Page 12
screw cover from the drive door by lifting it up and away from the computer. 11 Lift (1) and remove (2) the drive door from the back of the computer. 9 Remove the screw at the top of the drive door using a flathead or Torx screwdriver. 12 Loosen the captive screw on the side of - HP TouchSmart 610-1150xt | Upgrading and Servicing Guide - Page 13
screws that secure the hard disk drive to the hard-disk drive cage may have had rubber grommets. These grommets can fall off when you remove the hard drive from the hard-drive cage. Replacement grommets might be included with the new hard drive. If so, place a new grommet over each - HP TouchSmart 610-1150xt | Upgrading and Servicing Guide - Page 14
the drive door to the screw hole on the computer. 7 Install the screw securing the door to the back of the computer. 12 647642-001 - Removing and Replacing a Hard Disk Drive - HP TouchSmart 610-1150xt | Upgrading and Servicing Guide - Page 15
an upright position. 12 Plug the power cord into the back of the computer. 10 Replace the back cover on the computer. 13 Close the rear port access door at the back of the computer. 647642-001 - Removing and Replacing a Hard Disk Drive 13 - HP TouchSmart 610-1150xt | Upgrading and Servicing Guide - Page 16
it using the system recovery discs. To install the operating system, refer to the instructions included with your system recovery discs, or available from the HP support site (www.hp.com/support). After the operating system has been installed, you will need to reinstall any applications and - HP TouchSmart 610-1150xt | Upgrading and Servicing Guide - Page 17
Upgrading or replacing Memory HP TouchSmart610 PC Computer features may vary by model. Before You Begin Observe the following requirements before removing and replacing memory. IMPORTANT: A memory card is extremely sensitive to shock impact. Do not bang or drop it. Static electricity can damage - HP TouchSmart 610-1150xt | Upgrading and Servicing Guide - Page 18
pulling the door open (2). 5 Unplug all attached cables from the back of the computer. 6 Remove the small center panel below the rear ports by pulling out the top of the panel (1) then lifting the panel off the computer (2). 4 Unplug the computer by disconnecting the power cord from the back of - HP TouchSmart 610-1150xt | Upgrading and Servicing Guide - Page 19
the stand extends beyond the edge of the flat surface. 10 Slide the memory access panel toward the center of the computer until it stops (approximately 5 cm or 1/5 inch). 8 Remove the screw cover from the memory access panel by lifting it up and away from the computer. 11 Lift up the outside edge - HP TouchSmart 610-1150xt | Upgrading and Servicing Guide - Page 20
memory card (1) to release it. Holding the memory card by its edges, remove it from the compartment (2). Installing a New Memory Card NOTE: The replacement card faces forward and is on the right. 13 If you need to remove additional memory cards, repeat step12. 2 If using two memory cards, they - HP TouchSmart 610-1150xt | Upgrading and Servicing Guide - Page 21
you are replacing more than one memory card, repeat step 3 with each card. 7 Install the screw securing the memory access panel to the back of the computer. 5 Rinstall the memory access panel by sliding it in toward the center of the computer. 8 Press the top edge of the screw cover on to - HP TouchSmart 610-1150xt | Upgrading and Servicing Guide - Page 22
an upright position. 12 Plug the power cord into the back of the computer. 10 Replace the back cover on the computer. 13 Close the rear port access door at the back of the computer. 11 Reconnect all the cables at the back of the computer. 14 Press the power button - HP TouchSmart 610-1150xt | Upgrading and Servicing Guide - Page 23
Troubleshooting If the computer displays a memory error after you have turned it back on, turn the computer off and unplug the power cord, then open up
-
 1
1 -
 2
2 -
 3
3 -
 4
4 -
 5
5 -
 6
6 -
 7
7 -
8
-
9
-
10
-
11
-
12
-
13
-
14
-
15
-
16
-
17
-
18
-
19
-
20
-
21
-
22
-
23
 |
 |
Removing and Replacing a CD/DVD Drive
.......
2
Removing the CD/DVD Drive
................................
2
Installing a New CD/DVD Drive
............................
5
Removing and Replacing a Hard Disk Drive
....
9
Removing the Hard Disk Drive
...............................
9
Installing a New Hard Disk Drive
........................
11
Upgrading or Replacing Memory
..................
16
Removing the Memory
.......................................
16
Installing a New Memory Card
...........................
18
Troubleshooting
.................................................
21
UPGRADING AND SERVICING GUIDE
HPTouchSmart
610
PC
Computer features may vary by model.