HP W2338h HP 2310mfa, 2310mfd LCD Monitors - User Guide - Page 30
FOR DTV MODEL, PICTURE MENU, Navigation Ring
 |
UPC - 884420172529
View all HP W2338h manuals
Add to My Manuals
Save this manual to your list of manuals |
Page 30 highlights
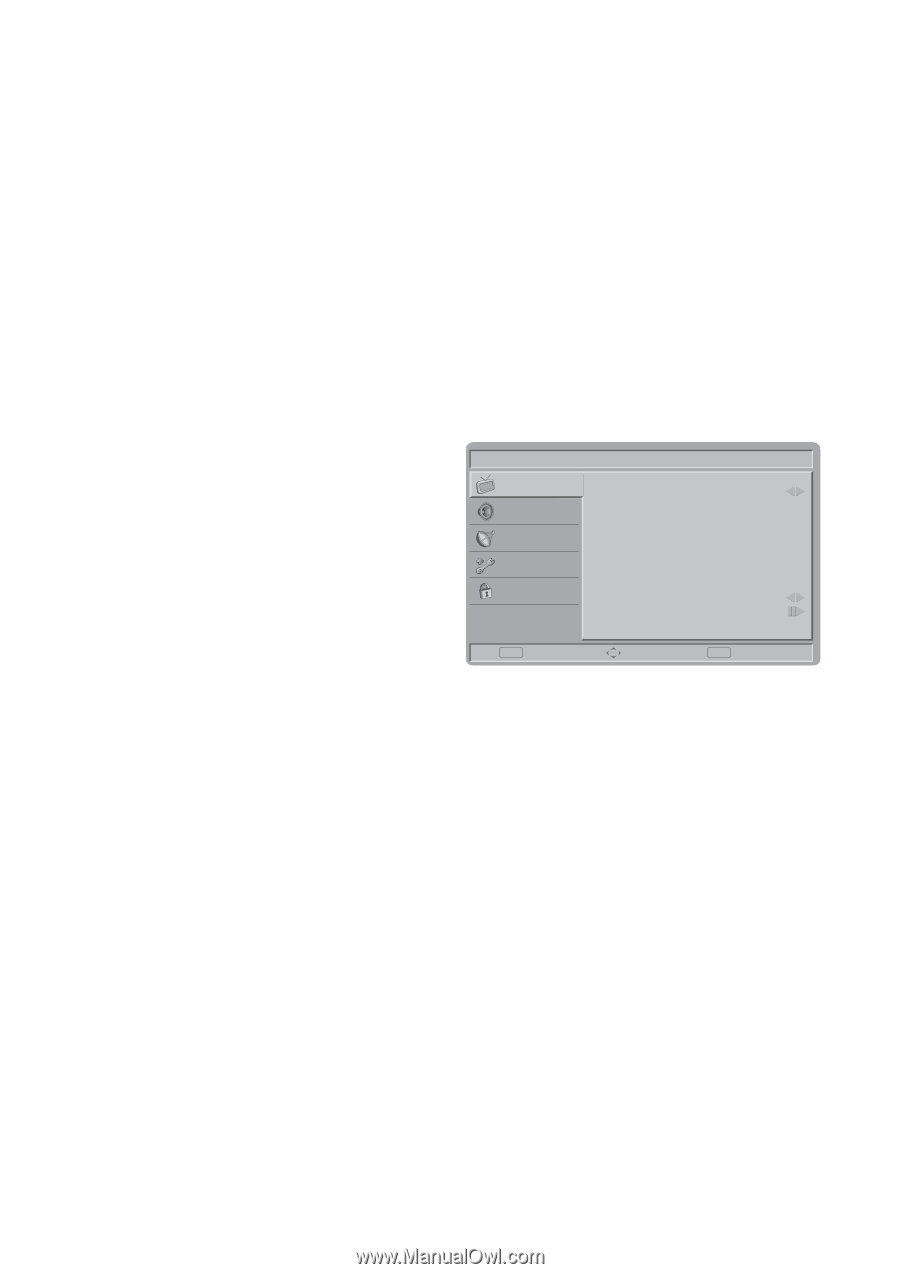
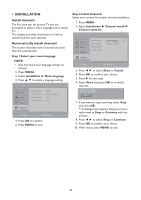
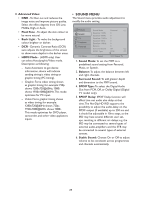
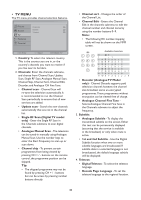
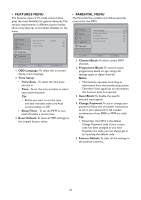
Rename channels Channels can be renamed so that a name of your choice appears whenever the channel is selected. 1. When watching TV, press CH LIST to display the channel list. 2. Select the channel you want to rename. 3. Press ►. The channel options menu appears. 4. Press to select and enter Rename chan.. A text input box appears. 5. Press to select characters. 6. Press OK to confirm each of the characters. NOTE • Rename channels- the length of the name is limited to six characters. • Use Aa to change upper-case letter to lower-case letter and vice versa. Rearrange channels After you install channels, you can rearrange the order in which they appear. 1. When watching TV, press CH LIST to display the channel list. 2. Press ►. The channel options menu appears. 3. Press to select and enter Reorder. 4. Press to select the new position. 5. Press OK to confirm the new position. 6. Press ►. Done reordering appears. 7. Press OK to finish reordering. Reset the TV to factory settings You can restore the default picture and sound settings of your TV. Channel installation settings remain the same. FOR DTV MODEL 1. Press the MENU/EXIT button to display or close the main menu. 2. Use the Navigation Ring to move around to select, adjust or confirm an item in the OSD (On Screen Display) menu. Press the MENU/EXIT button to enter the main OSD. Adjust the items including Picture, Sound, TV, Features, and Parental. However, some function items in the menus may only be enabled in the particular source modes. • PICTURE MENU The Picture menu shown below in most source modes, provides several video adjustment items for fine tuning the video display. Picture Sound TV Features Parental Picture Mode Brightness Contrast Colour Tint Sharpness Colour Temperature Advanced Video Standard 50 50 50 0 3 Cool OK Enter Select EXIT Watch TV 1. Picture Mode: To set the best picture appearance to a predefined picture setting from Standard,Vivid, Movie, Eco, or Personal. 2. Brightness: To brighten the dark parts of the picture. 3. Contrast: To sharpen the picture quality. 4. Colour: To add or reduce colour. 5. Tint: To adjust the picture tint. 6. Sharpness: To improve detail. 7. Colour Temperature: To choose between Normal (neutral), Warm (redder), and Cool (bluer). 1. Press MENU. 2. Select Installation ► Factory settings. 3. Reset is highlighted. 4. Press OK to reset to factory settings. 5. Press MENU to exit. 28
-
 1
1 -
2
-
3
-
4
-
5
-
6
-
7
-
8
-
9
-
10
-
11
-
12
-
13
-
14
-
15
-
16
-
17
-
18
-
19
-
20
-
21
-
22
-
23
-
24
-
 25
25 -
 26
26 -
 27
27 -
 28
28 -
 29
29 -
 30
30 -
 31
31 -
 32
32 -
 33
33 -
 34
34 -
 35
35 -
36
-
37
-
38
-
39
-
40
 |
 |