Honeywell RTH8500D Owner's Manual - Page 14
wall surface.
 |
UPC - 085267256865
View all Honeywell RTH8500D manuals
Add to My Manuals
Save this manual to your list of manuals |
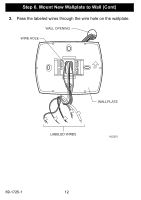
Page 14 highlights
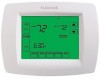
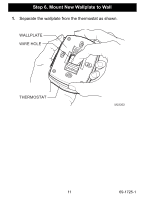
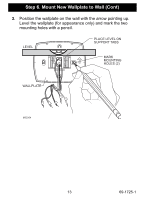
Step 6. Mount New Wallplate to Wall (Cont) 4. Move the wallplate aside and drill holes at the locations marked on the wall. Drill 3/16 in. holes for drywall or 7/32 in. holes for plaster. 5. Tap the wall anchors into the drilled holes until even with the wall surface. DRILLED HOLES (2) WALL ANCHORS (2) WALLPLATE M22205 MOUNTING SCREWS (2) 6. Position the wallplate over the wall anchors. 7. Insert the mounting screws into the wall anchors. Check leveling, if desired, and tighten the mounting screws. 69-1725-1 14
-
 1
1 -
2
-
3
-
4
-
5
-
6
-
7
-
8
-
 9
9 -
 10
10 -
 11
11 -
 12
12 -
 13
13 -
 14
14 -
 15
15 -
 16
16 -
 17
17 -
 18
18 -
 19
19 -
20
-
21
-
22
-
23
-
24
-
25
-
26
-
27
-
28
-
29
-
30
-
31
-
32
-
33
-
34
-
35
-
36
-
37
-
38
-
39
-
40
-
41
-
42
-
43
-
44
-
45
-
46
-
47
-
48
-
49
-
50
-
51
-
52
-
53
-
54
-
55
-
56
-
57
-
58
-
59
-
60
-
61
-
62
-
63
-
64
 |
 |
69-1725-1
14
Step 6. Mount New Wallplate to Wall (Cont)
4.
Move the wallplate aside and drill holes at the locations marked
on the wall. Drill 3/16 in. holes for drywall or 7/32 in. holes
for plaster.
5.
Tap the wall anchors into the drilled holes until even with the
wall surface.
6.
Position the wallplate over the wall anchors.
7.
Insert the mounting screws into the wall anchors. Check
leveling, if desired, and tighten the mounting screws.
M22205
DRILLED
HOLES (2)
WALL
ANCHORS (2)
MOUNTING
SCREWS (2)
WALLPLATE