Honeywell RTH8500D Owner's Manual - Page 16
Step 7. Connect Wires to New Wallplate Cont
 |
UPC - 085267256865
View all Honeywell RTH8500D manuals
Add to My Manuals
Save this manual to your list of manuals |
Page 16 highlights
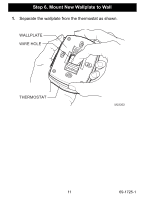
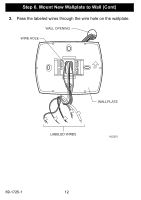
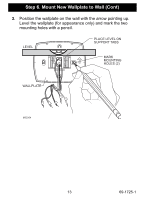
Step 7. Connect Wires to New Wallplate (Cont) 5. Loosen the screw terminals. Insert the labeled wires into the holes on the side of the terminal block that match the letter designations. Tighten the screw terminals. 6. If any of the labeled wires do not match the letter designations, see next page for wire connections. WALLPLATE WIRE HOLE INSERT WIRE IN HOLE YW RC R G LABELED WIRES TERMINAL BLOCK SCREW TERMINALS LETTER DESIGNATIONS RC R W Y G C (NOT USED) M22207 69-1725-1 16
-
 1
1 -
2
-
3
-
4
-
5
-
6
-
7
-
8
-
9
-
10
-
 11
11 -
 12
12 -
 13
13 -
 14
14 -
 15
15 -
 16
16 -
 17
17 -
 18
18 -
 19
19 -
 20
20 -
 21
21 -
22
-
23
-
24
-
25
-
26
-
27
-
28
-
29
-
30
-
31
-
32
-
33
-
34
-
35
-
36
-
37
-
38
-
39
-
40
-
41
-
42
-
43
-
44
-
45
-
46
-
47
-
48
-
49
-
50
-
51
-
52
-
53
-
54
-
55
-
56
-
57
-
58
-
59
-
60
-
61
-
62
-
63
-
64
 |
 |

69-1725-1
16
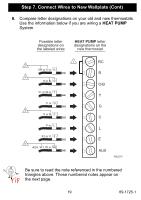
Step 7. Connect Wires to New Wallplate (Cont)
5.
Loosen the screw terminals. Insert the labeled wires into the
holes on the side of the terminal block that match the letter
designations. Tighten the screw terminals.
6.
If any of the labeled wires do not match the letter designations,
see next page for wire connections.
M22207
LABELED WIRES
C
(NOT USED)
G
W
R
RC
SCREW TERMINALS
TERMINAL BLOCK
LETTER
DESIGNATIONS
Y
INSERT WIRE IN HOLE
WIRE HOLE
RC
W
R
G
WALLPLATE
Y