Honeywell RTH8500D Owner's Manual - Page 19
Be sure to read the note referenced in the numbered
 |
UPC - 085267256865
View all Honeywell RTH8500D manuals
Add to My Manuals
Save this manual to your list of manuals |
Page 19 highlights
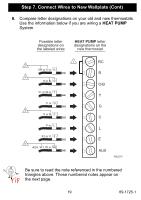
Step 7. Connect Wires to New Wallplate (Cont) 8. Compare letter designations on your old and new thermostats. Use the information below if you are wiring a HEAT PUMP System. Possible letter designations on the labeled wires HEAT PUMP letter designations on the new thermostat 1 2 VR or V or R 3 H or B, O Y1 or M or Y F or G 3 X or B, C F or L X2 or X, E 4 AUX, W1, W or W2 RC R O/B Y G C L E AUX M22210 Be sure to read the note referenced in the numbered triangles above. These numbered notes appear on the next page. 19 69-1725-1
-
 1
1 -
2
-
3
-
4
-
5
-
6
-
7
-
8
-
9
-
10
-
11
-
12
-
13
-
 14
14 -
 15
15 -
 16
16 -
 17
17 -
 18
18 -
 19
19 -
 20
20 -
 21
21 -
 22
22 -
 23
23 -
 24
24 -
25
-
26
-
27
-
28
-
29
-
30
-
31
-
32
-
33
-
34
-
35
-
36
-
37
-
38
-
39
-
40
-
41
-
42
-
43
-
44
-
45
-
46
-
47
-
48
-
49
-
50
-
51
-
52
-
53
-
54
-
55
-
56
-
57
-
58
-
59
-
60
-
61
-
62
-
63
-
64
 |
 |
19
69-1725-1
Step 7. Connect Wires to New Wallplate (Cont)
8.
Compare letter designations on your old and new thermostats.
Use the information below if you are wiring a
HEAT PUMP
System.
Be sure to read the note referenced in the numbered
triangles above. These numbered notes appear on
the next page.
L
C
Y
R
RC
VR or V or
M22210
2
3
3
1
G
AUX
E
R
O
Y
G
C
L
E
W2
O/B
4
H or B,
Y1 or M or
F or
X or B,
F or
X2 or X,
AUX, W1, W or
HEAT PUMP
letter
designations on the
new thermostat
Possible letter
designations on
the labeled wires