Hoover C1414 Manual
Hoover C1414 Manual
 |
UPC - 073502023815
View all Hoover C1414 manuals
Add to My Manuals
Save this manual to your list of manuals |
Hoover C1414 manual content summary:
- Hoover C1414 | Manual - Page 1
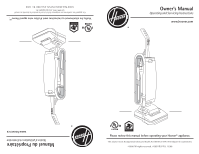
Owner's Manual Operating and Servicing Instructions www.hoover.com Please review this manual before operating your Hoover® appliance. This cleaner meets Occupational Safety and Health Act (OSHA-29 CFR 1910 Subpart S) requirements. ©2008 All rights reserved. #56511B37 R3. 12/08 Manuel du Proprié - Hoover C1414 | Manual - Page 2
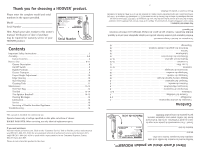
de votre produit HOOVER. Numéro de série This vacuum is intended for commercial use. Operate cleaner only at voltage specified on data plate on bottom of cleaner. DOUBLE INSULATED: When servicing, use only identical replacement parts. Contents Important Safety Instructions 3 Assembly 4-8 Carton - Hoover C1414 | Manual - Page 3
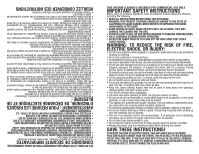
THIS VACUUM CLEANER IS INTENDED FOR COMMERCIAL USE ONLY. IMPORTANT SAFETY INSTRUCTIONS When using an electrical appliance, basic precautions should always be followed, including the following: • READ ALL INSTRUCTIONS BEFORE USING THIS APPLIANCE. • WARNING: THIS PRODUCT CONTAINS CHEMICALS KNOWN TO - Hoover C1414 | Manual - Page 4
les instructions et de les respecter dans l'ordre. La figure ci-contre illustre l'appareil une fois celui-ci assemblé. 1.1 H K K. Hose and cleaning tools L. Extension wand J. Paper bag A B C D J I. Handle bolt and nut packet G (One extra nut included) H. Cleaner base G. Bag compartment - Hoover C1414 | Manual - Page 5
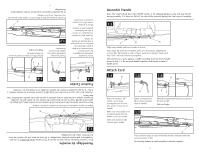
three notches indicated and note correct position of (D). Do not plug cleaner in until assembly is entirely complete 5 Assemblage du manche Nota : in Fig. 1.4. Do not push handle together with hands on ends of handle parts. C B A Aligner les parties supérieure et inférieure du manche, tel qu' - Hoover C1414 | Manual - Page 6
driver. Only one nut is needed on this model. The extra nut is not required but has front, place assembled handle down onto extension on cleaner base (K1). Rock handle side to side while le support à accessoires sur le côté gauche du manche, en alignant les flèches et les lettres. Tenir le support à - Hoover C1414 | Manual - Page 7
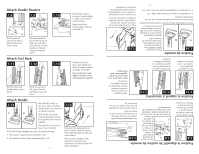
opening in paper bag with dirt tube (R) inside bag compartment. Push paper bag firmly onto tube. Tuck top and bottom of paper bag into bag compartment. of bag compartment. Attach Bag Compartment Insérer le raccord du tuyau dans le côté du support. Pousser fermement le tuyau dans le support aux - Hoover C1414 | Manual - Page 8
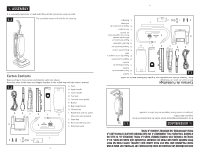
14. Rallonge 7 15. Support à accessoires 16. Brosse à bag. 1 2 3 5. Bag door 4. Bag door latch 3. Cord hooks: wrap cord around hooks for storage. 2. HOW TO USE Cleaner cleaner is turned on, the agitator will continue to rotate when cleaner handle is in upright position. Avoid tipping cleaner - Hoover C1414 | Manual - Page 9
cord into electrical outlet and turn cleaner ON. With handle in upright position, pull back on handle until front of cleaner (B) is lifted off the carpet. This insures that the paper bag is inflated. The handle of your cleaner has three positions; upright for storage and when using cleaning tools - Hoover C1414 | Manual - Page 10
of the front of the cleaner to help remove dirt in carpet near baseboards and furniture. Guide either side of the cleaner parallel to the edge of sliding the control, the handle should be in the upright position. The front of the cleaner will not move into the adjusted position until the handle - Hoover C1414 | Manual - Page 11
surfaces above the floor and reach hard to clean areas. Use tools with the cleaner handle in upright position. CAUTION: Agitator continues to rotate while cleaner handle is in upright position. Avoid tipping cleaner or setting it on furniture, fringed area rugs, or carpeted stairs during tool use - Hoover C1414 | Manual - Page 12
Il est possible de se procurer les sacs-filtres auprès d'un détaillant Hoover autorisé, des principaux détaillants ou des centres de service Hoover. 12 3. MAINTENANCE Disconnect cleaner from electrical outlet before attempting to service it in any manner. Do not operate without paper bag in place. - Hoover C1414 | Manual - Page 13
dans la nouvelle courroie et placer la courroie dans le guide de courroie (C). Pousser l'extrémité de la courroie Belt The belt on your HOOVER cleaner causes the agitator to rotate and is important for the effective operation of the cleaner. The belt is located under the bottom plate of the cleaner - Hoover C1414 | Manual - Page 14
effective operation, use only genuine HOOVER belts with your cleaner. When purchasing a new belt, ask for Hoover part No. 38528-040. 3.12 Replace hood and carpet height control. If agitator does not turn, remove bottom plate and reposition belt in belt guide. La courroie (cont.) Remplacement - Hoover C1414 | Manual - Page 15
and a problem persists, contact your Hoover Factory Service Center or Authorized Warranty Service Dealer (Depot). 15 Brushroll: What to Buy To assure effective operation, use only genuine HOOVER Agitator Brushrolls with your cleaner. When purchasing a new Agitator Brushroll, ask for Hoover part No - Hoover C1414 | Manual - Page 16
. Service To obtain approved HOOVER service and genuine HOOVER parts, locate the nearest Hoover Sales and Service Center or Authorized Hoover Warranty Service Dealer (Depot) by: • checking the Yellow Pages under "Vacuum Cleaners - Household" • checking the Service section of Hoover on-line at hoover - Hoover C1414 | Manual - Page 17
www.hoover.com Repase por favor este manual antes de funcionar su aplicación de Hoover®. Esta aspiradora cumple con los requisitos de la Ley de seguridad y salud ocupacional (Occupational Safety and Health Act, OSHA; Título 29 Sección 1910 Inciso S del Código Federal de Reglamentaciones [Code of - Hoover C1414 | Manual - Page 18
su recibo de compra a este manual del usuario. Para obtener el servicio de garantía de compra de su producto HOOVER, es posible que se requiera la voltee la aspiradora y retire el control de altura para moquetas en la parte delantera de la cubierta. Sujete el control y tire de él. 3.15 Coloque - Hoover C1414 | Manual - Page 19
a una flecha en la parte inferior de la aspiradora. En • Úsela solamente como se indica en este manual. Use solamente los accesorios recomendados por el fabricante. • de servicio de fábrica de Hoover o Distribuidor de servicio de garantía comercial autorizado de Hoover. • No tire ni lo - Hoover C1414 | Manual - Page 20
an juntos en la bolsa sellada con el manual del usuario. 1.2 A. Cordón B. Mango extensión E4 La correa La correa de su aspiradora Hoover hace que el agitador gire y es importante para és de la correa nueva (con la inscripción en la parte exterior de la E aspiradora) y coloque la correa en - Hoover C1414 | Manual - Page 21
inferior de la bolsa de filtro. Introduzca las 3 lengüetas (C) en la parte inferior de la puerta de la bolsa dentro de las 3 ranuras que se encuentran únicamente bolsas de filtro de HOOVER genuinas distribuidas por Hoover, Inc. Las bolsas de HOOVER pueden identificarse por estas marcas - Hoover C1414 | Manual - Page 22
bien. (Es posible que se requiera esfuerzo adicional). Conexíon del mango 1.14 K1 FRONT K2 FRONT Con el interruptor para encender/apagar en la parte delantera de la aspiradora, coloque el mango ensamblado hacia abajo sobre la extensión en la base de la aspiradora (K1). Mueva el mango de un - Hoover C1414 | Manual - Page 23
bolsa. 1.21 Para volver a colocar la puerta de la bolsa, levante el borde S inferior de la bolsa de filtro. Introduzca las 3 lengüetas (S) en la parte inferior de la puerta de la bolsa dentro de las 3 ranuras que se encuentran en el compartimento de la bolsa. Asegúrese de que todos - Hoover C1414 | Manual - Page 24
cordón en la toma de corriente eléctrica y encienda la aspiradora. Con el mango en posición vertical, tire el mango hacia atrás hasta que la parte delantera de la aspiradora (B) se despegue de la moqueta. Esto asegura que la bolsa de papel esté inflada. Posiciones del mango 2.3 El mango de su
-
 1
1 -
 2
2 -
 3
3 -
 4
4 -
 5
5 -
 6
6 -
 7
7 -
8
-
9
-
10
-
11
-
12
-
13
-
14
-
15
-
16
-
17
-
18
-
19
-
20
-
21
-
22
-
23
-
24
 |
 |
Veuillez lire attentivement ces instructions avant d’utiliser votre appareil Hoover
MD
.
www.hoover.ca
Manuel du Propriétaire
Notice d’utilisation et d’entretien
©
2008
Tous droits réservés
. #56511B37 R3. 12/08
Cet appareil est conforme aux exigences de la Loi sur la santé et la sécurité au travail
(29 CFR 1910, sous paragraphe S).
Please review this manual before operating your Hoover® appliance.
www.hoover.com
Owner’s Manual
Operating and Servicing Instructions
©2008 All rights reserved. #56511B37 R3. 12/08
This cleaner meets Occupational Safety and Health Act (OSHA-29 CFR 1910 Subpart S) requirements.