Hoover C1414 Manual - Page 4
Contenu de l'emballage, Carton Contents
 |
UPC - 073502023815
View all Hoover C1414 manuals
Add to My Manuals
Save this manual to your list of manuals |
Page 4 highlights
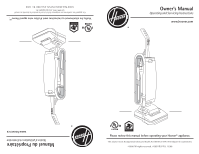
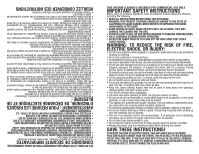
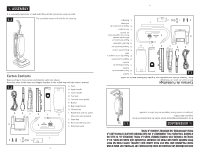
4 E I F L AFIN DE RÉDUIRE LES RISQUES DE CHOC ÉLECTRIQUE, CET APPAREIL EST MUNI D'UNE FICHE POLARISÉE UNE TIGE EST PLUS LARGE QUE L'AUTRE). CETTE FICHE NE PEUT ÊTRE INSÉRÉE DANS UNE PRISE DE COURANT POLARISÉE QUE DANS UN SENS. SI LA FICHE NE S'INSÈRE PAS COMPLÈTEMENT DANS LA PRISE, INVERSEZ-LA. SI ELLE NE S'INSÈRE TOUJOURS PAS, DEMANDEZ À UN ÉLECTRICIEN QUALIFIÉ D'INSTALLER LA PRISE APPROPRIÉE. NE MODIFIEZ JAMAIS LA FICHE. 1. ASSEMBLAGE Il est extrêmement important de lire toutes les instructions et de les respecter dans l'ordre. La figure ci-contre illustre l'appareil une fois celui-ci assemblé. 1.1 H K K. Hose and cleaning tools L. Extension wand J. Paper bag A B C D J I. Handle bolt and nut packet G (One extra nut included) H. Cleaner base G. Bag compartment F. Bracket E. Tool rack screw packet D. Tool rack C. Lower handle 1.2 A. Cord B. Upper handle Remove all parts from carton and identify each item shown. Note that some of the items are shipped together in the sealed bag with the owner's manual. Carton Contents Contenu de l'emballage Retirer toutes les pièces de l'emballage. Nota : Certains articles sont expédiés avec le guide d'utilisation dans le sac scellé. 1.2 A. Cordon B. Partie supérieure du manche C. Partie inférieure du manche D. Support à accessoires E. Paquet de vis du support à outil A B C D J F. Dispositif de soutien G G. Compartiment du sac H. Base de l'aspirateur H K I. Paquet de boulons et d'écrous du manche (Un écrou supplémentaire est fourni) J. Sac en papier L E I F K. Tuyau et accessoires de nettoyage L. Rallonges 4 1.1 The assembled cleaner will look like this drawing. It is extremely important to read and follow all the instruction steps in order. 1. ASSEMBLY
-
 1
1 -
 2
2 -
 3
3 -
 4
4 -
 5
5 -
 6
6 -
 7
7 -
 8
8 -
 9
9 -
 10
10 -
11
-
12
-
13
-
14
-
15
-
16
-
17
-
18
-
19
-
20
-
21
-
22
-
23
-
24
 |
 |
