Husqvarna L 221AK Owner Manual - Page 19
Maintenance, Montage Et RÉglages
 |
View all Husqvarna L 221AK manuals
Add to My Manuals
Save this manual to your list of manuals |
Page 19 highlights
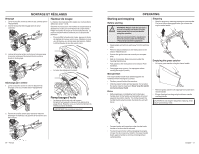
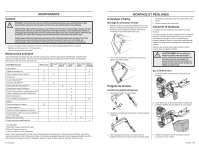
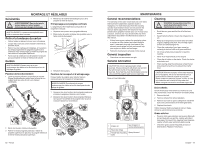
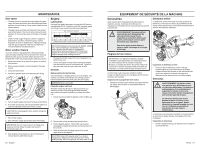
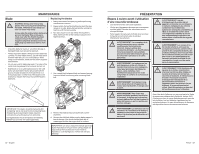
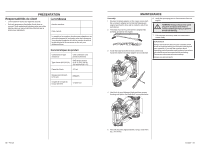
MONTAGE ET RÉGLAGES Généralités ! AVERTISSEMENT! Pour éviter que le moteur démarre, retirer le câble d'allumage de la bougie d'allumage. MISE EN GARDE! La tondeuse est expédiée sans huile ou essence dans le moteur. Retirer la tondeuse du carton • Retirer toutes les pièces incluses avec la tondeuse. • Couper deux coins de carton et étaler l'extrémité du panneau à plat. • Retirer tous les matériaux d'emballage, à l'exception du rembourrage entre les poignées supérieure et inférieure et du rembourrage qui retient la poignée de frein moteur à la poignée supérieure. • Faire rouler la tondeuse hors de la boîte et s'assurer qu'aucune pièce ne reste à l'intérieur de la boîte. Guidon 4 Retirer tout le matériel d'emballage autour de la poignée de frein de moteur. Entreposage avec poignée verticale La poignée peut être réglée dans une position de rangement verticale. 1 Desserrer les boutons de la poignée inférieure. 2 Faire pivoter le guidon et aligner les goupilles avec la fente verticale du support. MISE EN GARDE! Prendre soin de ne pas endommager les câbles et les fils électriques lors du dépliage du guidon. Position de fonctionnement 1 Lever la poignée inférieure en position de marche. Aligner les goupilles du guidon avec la fente de son support pour que celui-ci soit à une hauteur confortable. 3 Resserrer les boutons. Position de transport et d'entreposage On peut replier la poignée pour réduire l'espace nécessaire pour le transport et l'entreposage. MISE EN GARDE! Prendre soin de ne pas endommager les câbles et les fils électriques lors du pliage du guidon. 1 Desserrer les deux boutons de la poignée supérieure et laisser la poignée s'abaisser vers l'arrière. 2 Desserrer les deux boutons de la poignée inférieure, faire pivoter l'ensemble de la poignée vers l'avant et la laisser reposer sur la tondeuse. 2 Serrer les boutons inférieurs du guidon. 3 Retirer le rembourrage de protection, relever la poignée supérieure en place sur la poignée inférieure et serrer les deux boutons supérieurs. 62 - French MAINTENANCE General recommendations The warranty on this lawn mower does not cover items that have been subjected to operator abuse or negligence. To receive full value from the warranty, operator must maintain mower as instructed in this manual. Some adjustments will need to be made periodically to properly maintain your unit. At least once a season, check to see if you should make any of the adjustments described in the Maintenance section of this manual. • At least once a year, replace the spark plug, clean or replace air filter element and check blade for wear. A new spark plug and clean/new air filter element assure proper air-fuel mixture and help your engine run better and last longer. • Follow the maintenance schedule in this manual. General inspection • Check that nuts and screws are tight. General lubrication CAUTION! Do not oil or grease plastic wheel bearings. Viscous lubricants will attract dust and dirt that will shorten the life of the selflubricating bearings. If you feel they must be lubricated, use only a dry powdered graphite type lubricant sparingly. Keep unit well lubricated. 2 Cleaning ! WARNING! Always disconnect the spark plug before performing maintenance or service. • Brush leaves, grass and the like off of the lawn mower. • Keep finished surfaces / wheels free of gasoline, oil, etc. • Keep top of engine around starter clear and clean of grass clippings and chaff. This will help engine air flow and extend engine life. • Clean the underside of your lawn mower by scraping to remove build-up of grass and trash. • Do not use a high pressure washer to clean the machine. • Never flush water directly on the engine. • Clean the air intake on the starter. Check the starter and starter cord. • When cleaning under the cutting cover, empty the fuel tank and put the machine on its side with the muffler down. CAUTION! With the exception of the water washout port (if equipped), we do not recommend using a garden hose to clean the outside of your lawn mower unless the electrical system, muffler, air filter and carburetor are covered to keep water out. Water in engine can result in shortened engine life. 1 3 1 Engine oil See "Engine" in section Maintenance 2 Rear door hinge 3 Handle bar mounting bolts Spray lubricant Drive wheels Check wheels each time before you mow to be sure they move freely. Clean the wheels if not rotating freely. 1 Remove the bolt. 2 Remove wheels from wheel adjusters. 3 Remove any trash or grass cuttings from inside the dust cover, pinion and/or drive wheel gear teeth. 4 Replace the wheels. If after cleaning, the drive wheels do not turn freely, contact a authorized service workshop. Grass catcher • Pores in cloth grass catchers can become filled with dirt and dust with use and the catcher will collect less grass. To prevent this, regularly hose the grass catcher off with water and let dry before using. • Check the grass catcher frequently for wear or deterioration. Replace if necessary. English - 19
-
 1
1 -
2
-
3
-
4
-
5
-
6
-
7
-
8
-
9
-
10
-
11
-
12
-
13
-
 14
14 -
 15
15 -
 16
16 -
 17
17 -
 18
18 -
 19
19 -
 20
20 -
 21
21 -
 22
22 -
 23
23 -
 24
24 -
25
-
26
-
27
-
28
-
29
-
30
-
31
-
32
-
33
-
34
-
35
-
36
-
37
-
38
-
39
-
40
 |
 |
