Husqvarna L 221AK Owner Manual - Page 6
Entretien, Presentation
 |
View all Husqvarna L 221AK manuals
Add to My Manuals
Save this manual to your list of manuals |
Page 6 highlights
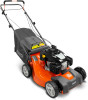
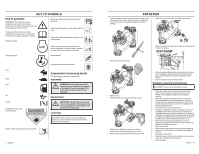
PRESENTATION Dear customer! Congratulations on your choice to buy a Husqvarna product! Husqvarna is based on a tradition that dates back to 1689, when the Swedish King Karl XI ordered the construction of a factory on the banks of the Huskvarna River, for production of muskets. The location was logical, since water power was harnessed from the Huskvarna River to create the water-powered plant. During over 300 years of continuous operation, the Husqvarna factory has produced a lot of different products, from wood stoves to modern kitchen appliances, sewing machines, bicycles, motorcycles etc. In 1956, the first motor driven lawn mowers appeared, followed by chain saws in 1959, and it is within this area Husqvarna is working today. Today Husqvarna is one of the leading manufacturers in the world of forest and garden products, with quality as our highest priority. We develop, manufacture and market high quality motor driven products for forestry and gardening as well as for building and construction industry. Your purchase gives you access to professional help with repairs and service whenever this may be necessary. If the retailer who sells your machine is not one of our authorized dealers, ask for the address of your nearest servicing dealer. It is our wish that you will be satisfied with your product and that it will be your companion for a long time. Think of this operator's manual as a valuable document. By following its' content (using, service, maintenance etc) the life span and the second-hand value of the machine can be extended. If you ever lend or sell this machine, make sure that the borrower or buyer gets the operator's manual, so they will also know how to properly maintain and use it. Thank you for using a Husqvarna product. Husqvarna AB has a policy of continuous product development and therefore reserves the right to modify the design and appearance of products without prior notice. For customer assistance, contact us at our website: www.husqvarna.com Customer responsibilities • Read and observe the safety rules. • Follow the maintenance schedule in this manual. Any maintenance other than that described in this manual must be carried out by your servicing dealer (retailer). The Lawn mower Serial number: Date of purchase: The model and serial numbers will be found on a decal attached to the rear of the lawn mower housing. You should record both serial number and date of purchase and keep in a safe place for future reference. Product specifications Gasoline Capacity and Type Oil Type (API SG-SL) 1.09 Quarts / 1.03 Liters (Unleaded Regular Only) SAE 30 (above 0qC / 32qF) SAE 5W-30 (below 0q / 32qF) Oil Capacity 15 Ounces Spark Plug (Gap: 0.020'' / 0.5mm) AUTOLITE 5924 Blade Bolt Torque 35-40 ft. Ibs. (47-54 Nm) ENTRETIEN également que le boulon de lame n'est pas endommagé et que l'arbre du moteur n'est pas tordu. IMPORTANT! Utiliser seulement une lame de remplacement approuvée par le fabricant de la tondeuse. L'utilisation d'une lame non approuvée par le fabricant de la tondeuse comporte des risques, peut endommager cette dernière et annuler la garantie. 4 Utiliser une cale en bois entre la lame et le carter de tondeuse et serrer le boulon de lame en le tournant dans le sens des aiguilles d'une montre. Montage 1 Positionner l'adaptateur de lame sur le vilebrequin du moteur. S'assurer que le contacteur de l'adaptateur et la clavette du vilebrequin sont alignés et que la courroie d'entraînement se trouve à l'intérieur de l'onglet de retenue de la courroie. 2 La lame doit être montée avec l'extrémité coudée vers le haut, vers le moteur. 3 Installer le boulon de lame en s'assurant que la rondelle de blocage et la rondelle trempée se trouvent dans l'adaptateur de lame et le vilebrequin. 5 Le boulon doit être serré à un couple compris entre 47 et 54 N.m. 6 Vérifier que le câble de la bougie est débranché du moteur. ! AVERTISSEMENT! Toujours débrancher le câble de la bougie et le placer de telle sorte qu'il n'entre pas en contact avec celle-ci afin de prévenir tout démarrage accidentel. 7 Tirer la lame à la main pour s'assurer qu'elle tourne librement. IMPORTANT! Toujours faire preuve d'attention et de bon sens. Éviter toutes les situations qui vous semblent difficiles. En cas d'appréhension au sujet des procédures d'utilisation après avoir lu ces instructions, il faudrait consulter un expert avant de continuer. Communiquer avec un atelier de réparation agréé. Toujours utiliser des pièces d'origine. 6 - English French - 75
-
 1
1 -
 2
2 -
 3
3 -
 4
4 -
 5
5 -
 6
6 -
 7
7 -
 8
8 -
 9
9 -
 10
10 -
 11
11 -
 12
12 -
13
-
14
-
15
-
16
-
17
-
18
-
19
-
20
-
21
-
22
-
23
-
24
-
25
-
26
-
27
-
28
-
29
-
30
-
31
-
32
-
33
-
34
-
35
-
36
-
37
-
38
-
39
-
40
 |
 |
