JVC GS-TD1BUS Basic User Guide - Page 15
Still Image Recording
 |
View all JVC GS-TD1BUS manuals
Add to My Manuals
Save this manual to your list of manuals |
Page 15 highlights
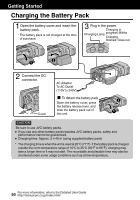
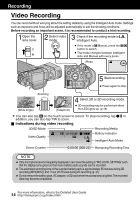
Getting Started Recording o 3D recording formats There are 2 types of 3D recording formats. By default, "3D VIDEO REC FORMAT" in the menu is set to "AVCHD". To change the setting to "MP4(MVC)", refer to the Detailed User Guide. AVCHD Higher compatibility MP4(MVC) Higher video quality 0 Videos recorded in MP4(MVC) format are saved in full high definition and can only be played back on this unit. 0 To record 3D images to a disc with a Blu-ray recorder or a computer, set to "AVCHD". 0 By dubbing videos recorded in AVCHD format to a Blu-ray recorder, the left and right images will be recorded separately. This allows 3D images to be enjoyed when viewing with a 3D compatible TV. 0 Videos recorded in "MP4(MVC)" and "AVCHD" are displayed on the playback index screen separately. Still Image Recording Select still image mode. Set the focus on the subject. Press halfway Playback Copying Lights up in green when focused Take a still image. Select 3D or 2D recording mode. Press fully 3D recording may be performed when the LED lights up. (p.16) Lights up during still image recording . 0 You can also tap Q on the touch screen to record. However, focus cannot be set by pressing halfway. o Indications during still image recording 3D/2D Mode Recording Media Shutter Speed Image Size Focus Recording in Progress . 10:10AM [ Battery Indicator Intelligent Auto Mode 8] Remaining Number of Shots 15 For more information, refer to the Detailed User Guide http://manual.jvc.co.jp/index.html/ Further Information
-
 1
1 -
2
-
3
-
4
-
5
-
6
-
7
-
8
-
9
-
 10
10 -
 11
11 -
 12
12 -
 13
13 -
 14
14 -
 15
15 -
 16
16 -
 17
17 -
 18
18 -
 19
19 -
 20
20 -
21
-
22
-
23
-
24
-
25
-
26
-
27
-
28
-
29
-
30
-
31
-
32
-
33
-
34
-
35
-
36
-
37
-
38
-
39
-
40
-
41
-
42
-
43
-
44
-
45
-
46
-
47
-
48
-
49
-
50
-
51
-
52
-
53
-
54
-
55
-
56
-
57
-
58
-
59
-
60
-
61
-
62
-
63
-
64
-
65
-
66
-
67
-
68
-
69
-
70
-
71
-
72
-
73
-
74
-
75
-
76
-
77
-
78
-
79
-
80
-
81
-
82
-
83
-
84
-
85
-
86
-
87
-
88
-
89
-
90
-
91
-
92
-
93
-
94
-
95
-
96
-
97
-
98
-
99
-
100
-
101
-
102
-
103
-
104
-
105
-
106
-
107
-
108
 |
 |
