JVC GS-TD1BUS Basic User Guide - Page 6
Contents, Verifying the Accessories
 |
View all JVC GS-TD1BUS manuals
Add to My Manuals
Save this manual to your list of manuals |
Page 6 highlights
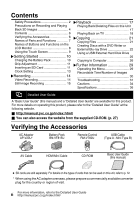
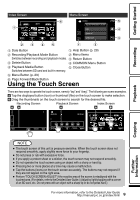
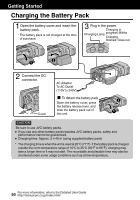
Contents Safety Precautions 2 Precautions on Recording and Playing Back 3D Images 4 Contents 6 Verifying the Accessories 6 Names of Parts and Functions 7 Names of Buttons and Functions on the LCD Monitor 8 Using the Touch Screen 9 IGetting Started 10 Charging the Battery Pack 10 Grip Adjustment 11 Inserting an SD Card 11 Clock Setting 13 IRecording 14 Video Recording 14 Still Image Recording 15 IPlayback 17 Playing Back/Deleting Files on this Unit 17 Playing Back on TV 18 ICopying 21 Copying Files 21 Creating Discs with a DVD Writer or External Blu-ray Drive 22 Using a USB External Hard Disk Drive 25 Copying to Computer 26 IFurther Information 29 Operating the Menu 29 Recordable Time/Number of Images 30 Troubleshooting 31 Cautions 34 Specifications 36 . Detailed User Guide A "Basic User Guide" (this manual) and a "Detailed User Guide" are available for this product. For more details on operating this product, please refer to the "Detailed User Guide" at the following website. o http://manual.jvc.co.jp/index.html/ o You can also access the website from the supplied CD-ROM. (p. 27) Verifying the Accessories AC Adapter AP-V20U* Battery Pack BN-VF815U Remote Control RM-V760U START /STOP SNAP SHOT USB Cable (Type A - Mini Type B) . AV Cable . HDMI Mini Cable INFO INDEX . CD-ROM . Basic User Guide (this manual) . . . . 0 SD cards are sold separately. For details on the types of cards that can be used on this unit, refer to p. 12. * When using the AC adapter overseas, please prepare a commercially available converter plug for the country or region of visit. 6 For more information, refer to the Detailed User Guide http://manual.jvc.co.jp/index.html/
-
 1
1 -
 2
2 -
 3
3 -
 4
4 -
 5
5 -
 6
6 -
 7
7 -
 8
8 -
 9
9 -
 10
10 -
 11
11 -
 12
12 -
13
-
14
-
15
-
16
-
17
-
18
-
19
-
20
-
21
-
22
-
23
-
24
-
25
-
26
-
27
-
28
-
29
-
30
-
31
-
32
-
33
-
34
-
35
-
36
-
37
-
38
-
39
-
40
-
41
-
42
-
43
-
44
-
45
-
46
-
47
-
48
-
49
-
50
-
51
-
52
-
53
-
54
-
55
-
56
-
57
-
58
-
59
-
60
-
61
-
62
-
63
-
64
-
65
-
66
-
67
-
68
-
69
-
70
-
71
-
72
-
73
-
74
-
75
-
76
-
77
-
78
-
79
-
80
-
81
-
82
-
83
-
84
-
85
-
86
-
87
-
88
-
89
-
90
-
91
-
92
-
93
-
94
-
95
-
96
-
97
-
98
-
99
-
100
-
101
-
102
-
103
-
104
-
105
-
106
-
107
-
108
 |
 |
