JVC GS-TD1BUS Basic User Guide - Page 8
Names of Buttons and Functions on the LCD Monitor
 |
View all JVC GS-TD1BUS manuals
Add to My Manuals
Save this manual to your list of manuals |
Page 8 highlights
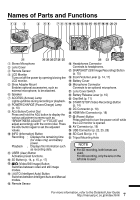
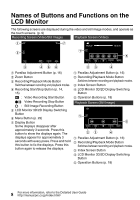
Names of Buttons and Functions on the LCD Monitor The following screens are displayed during the video and still image modes, and operate as the touch screens. (p. 9) Recording Screen (Video/Still Image) Playback Screen (Video) 1 7 00:01:23 00:12:34 2 1 5 3 . 456 A Parallax Adjustment Button (p. 16) B Zoom Button C Recording/Playback Mode Button Switches between recording and playback modes. D Recording Start/Stop Button (p. 14, 15) g : Video Recording Start Button a : Video Recording Stop Button Q : Still Image Recording Button E LCD Monitor 3D/2D Display Switching Button F Menu Button (p. 29) G Display Button Some displays disappear after approximately 3 seconds. Press this button to show the displays again. The displays appear for approximately 3 seconds with every press. Press and hold this button to fix the displays. Press this button again to release the displays. 23 4 . A Parallax Adjustment Button (p. 16) B Recording/Playback Mode Button Switches between recording and playback modes. C Index Screen Button D LCD Monitor 3D/2D Display Switching Button E Operation Buttons (p. 18) Playback Screen (Still Image) 1 5 23 4 . A Parallax Adjustment Button (p. 16) B Recording/Playback Mode Button Switches between recording and playback modes. C Index Screen Button D LCD Monitor 3D/2D Display Switching Button E Operation Buttons (p. 18) 8 For more information, refer to the Detailed User Guide http://manual.jvc.co.jp/index.html/
-
 1
1 -
2
-
 3
3 -
 4
4 -
 5
5 -
 6
6 -
 7
7 -
 8
8 -
 9
9 -
 10
10 -
 11
11 -
 12
12 -
 13
13 -
14
-
15
-
16
-
17
-
18
-
19
-
20
-
21
-
22
-
23
-
24
-
25
-
26
-
27
-
28
-
29
-
30
-
31
-
32
-
33
-
34
-
35
-
36
-
37
-
38
-
39
-
40
-
41
-
42
-
43
-
44
-
45
-
46
-
47
-
48
-
49
-
50
-
51
-
52
-
53
-
54
-
55
-
56
-
57
-
58
-
59
-
60
-
61
-
62
-
63
-
64
-
65
-
66
-
67
-
68
-
69
-
70
-
71
-
72
-
73
-
74
-
75
-
76
-
77
-
78
-
79
-
80
-
81
-
82
-
83
-
84
-
85
-
86
-
87
-
88
-
89
-
90
-
91
-
92
-
93
-
94
-
95
-
96
-
97
-
98
-
99
-
100
-
101
-
102
-
103
-
104
-
105
-
106
-
107
-
108
 |
 |
