JVC GS-TD1BUS Basic User Guide - Page 7
Names of Parts and Functions
 |
View all JVC GS-TD1BUS manuals
Add to My Manuals
Save this manual to your list of manuals |
Page 7 highlights
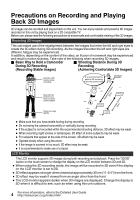
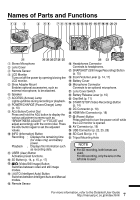
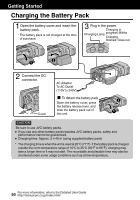
Names of Parts and Functions 12 3 4 56 78 90a bc d e fghi jk + l - u . tsrqp o A Stereo Microphone B Lens Cover C Remote Sensor D LCD Monitor Turns on/off the power by opening/closing the LCD monitor. E Shoe Adapter Mount Enables optional accessories, such as external microphone, to be attached. F Speaker G ACCESS (Access) Lamp Lights up/blinks during recording or playback. H POWER/CHARGE (Power/Charge) Lamp (p. 10) I ADJ Button/Control Dial Press and hold the ADJ button to display the various adjustment screens such as "BRIGHTNESS ADJUST" or "FOCUS" and adjust accordingly with the control dial. Press the ADJ button again to set the adjusted values. J INFO (Information) Button Recording : Displays the remaining time (for video only) and battery power. Playback : Displays file information such as recording date. K USER (User) Button Activates preset functions. L 3D Button (p. 14, p. 15, p. 17) M A/B (Video/Still Image) Button Switches between video and still image modes. N i.AUTO (Intelligent Auto) Button Switches between Intelligent Auto and Manual modes. O Remote Sensor nm P Headphones Connector Connects to headphones. Q SNAPSHOT (Still Image Recording) Button (p. 15) R Zoom/Volume Lever (p. 14, 17) S Battery Cover T Microphone Connector Connects to an optional microphone. U Lens Cover Switch V Battery Release Lever (p. 10) W Grip Belt (p. 11) X START/STOP (Video Recording) Button (p. 14) Y DC Connector (p. 10) Z HDMI Mini Connector (p. 18) a M (Power) Button Press and hold to turn the power on/off while the LCD monitor is opened. b AV Connector (p. 19) c USB Connector (p. 22, 25, 28) d SD Card Slot (p. 11) e Tripod Mounting Hole NOTE 0 For 3D recording, both lenses are used. For 2D recording, only the lens on the left side is used. 7 For more information, refer to the Detailed User Guide http://manual.jvc.co.jp/index.html/
-
 1
1 -
 2
2 -
 3
3 -
 4
4 -
 5
5 -
 6
6 -
 7
7 -
 8
8 -
 9
9 -
 10
10 -
 11
11 -
 12
12 -
13
-
14
-
15
-
16
-
17
-
18
-
19
-
20
-
21
-
22
-
23
-
24
-
25
-
26
-
27
-
28
-
29
-
30
-
31
-
32
-
33
-
34
-
35
-
36
-
37
-
38
-
39
-
40
-
41
-
42
-
43
-
44
-
45
-
46
-
47
-
48
-
49
-
50
-
51
-
52
-
53
-
54
-
55
-
56
-
57
-
58
-
59
-
60
-
61
-
62
-
63
-
64
-
65
-
66
-
67
-
68
-
69
-
70
-
71
-
72
-
73
-
74
-
75
-
76
-
77
-
78
-
79
-
80
-
81
-
82
-
83
-
84
-
85
-
86
-
87
-
88
-
89
-
90
-
91
-
92
-
93
-
94
-
95
-
96
-
97
-
98
-
99
-
100
-
101
-
102
-
103
-
104
-
105
-
106
-
107
-
108
 |
 |
