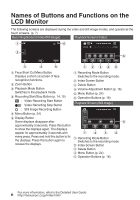
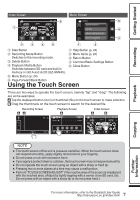
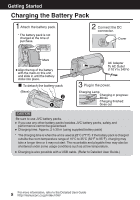
JVC GZ-HM440US Basic User Guide - Page 10
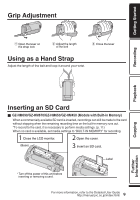
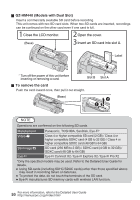
GZ-HM440 Models with Dual Slot, To remove the card, Insert an SD card into slot A., Open the cover. - gz hm440 user manual
 |
View all JVC GZ-HM440US manuals
Add to My Manuals
Save this manual to your list of manuals |
Page 10 highlights
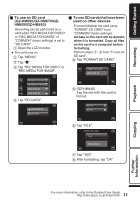
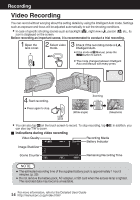
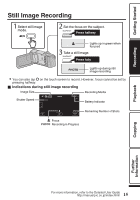
o GZ-HM440 (Models with Dual Slot) Insert a commercially available SD card before recording. This unit comes with two SD card slots. When two SD cards are inserted, recordings can be continued on the other card even if one card is full. Close the LCD monitor. Open the cover. (Base) Insert an SD card into slot A. Label Turn off the power of this unit before inserting or removing a card. Slot B o To remove the card Push the card inward once, then pull it out straight. (Base) Slot A .. NOTE Operations are confirmed on the following SD cards. Manufacturer Video A Still Image B Eye-Fi Panasonic, TOSHIBA, SanDisk, Eye-Fi* Class 4 or higher compatible SD card (2 GB) / Class 4 or higher compatible SDHC card (4 GB to 32 GB) / Class 4 or higher compatible SDXC card (48 GB to 64 GB) SD card (256 MB to 2 GB) / SDHC card (4 GB to 32 GB) / SDXC card (48 GB to 64 GB) Eye-Fi Connect X2 / Eye-Fi Explore X2 / Eye-Fi Pro X2 *Only the specified models may be used. Refer to the Detailed User Guide for details. 0 Using SD cards (including SDHC/SDXC cards) other than those specified above may result in recording failure or data loss. 0 To protect the data, do not touch the terminals of the SD card. 0 Eye-Fi manufactures SD memory cards with wireless LAN function. 10 For more information, refer to the Detailed User Guide http://manual.jvc.co.jp/index.html/
-
 1
1 -
2
-
3
-
4
-
 5
5 -
 6
6 -
 7
7 -
 8
8 -
 9
9 -
 10
10 -
 11
11 -
 12
12 -
 13
13 -
 14
14 -
 15
15 -
16
-
17
-
18
-
19
-
20
-
21
-
22
-
23
-
24
-
25
-
26
-
27
-
28
-
29
-
30
-
31
-
32
-
33
-
34
-
35
-
36
-
37
-
38
-
39
-
40
-
41
-
42
-
43
-
44
-
45
-
46
-
47
-
48
-
49
-
50
-
51
-
52
-
53
-
54
-
55
-
56
-
57
-
58
-
59
-
60
-
61
-
62
-
63
-
64
 |
 |
