JVC GZ-HM440US Basic User Guide - Page 12
Clock Setting
 |
View all JVC GZ-HM440US manuals
Add to My Manuals
Save this manual to your list of manuals |
Page 12 highlights
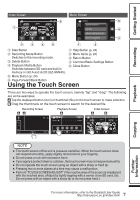
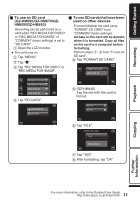
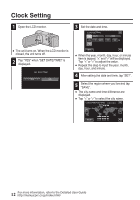
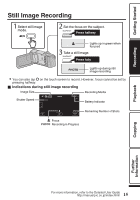
Clock Setting 1 Open the LCD monitor. . 0 The unit turns on. When the LCD monitor is closed, the unit turns off. 2 Tap "YES" when "SET DATE/TIME!" is displayed. SET DATE/TIME! YES NO . 3 Set the date and time. CLOCK SETTING DATE JAN 1 2011 TIME 10 00 . SET 0 When the year, month, day, hour, or minute item is tapped, "∧" and "∨" will be displayed. Tap "∧" or "∨" to adjust the value. 0 Repeat this step to input the year, month, day, hour, and minute. 4 After setting the date and time, tap "SET". 5 Select the region where you live and tap "SAVE". 0 The city name and time difference are displayed. 0 Tap "" to select the city name. CLOCK/AREA SETTING GMT . SAVE 12 For more information, refer to the Detailed User Guide http://manual.jvc.co.jp/index.html/
-
 1
1 -
2
-
3
-
4
-
5
-
6
-
 7
7 -
 8
8 -
 9
9 -
 10
10 -
 11
11 -
 12
12 -
 13
13 -
 14
14 -
 15
15 -
 16
16 -
 17
17 -
18
-
19
-
20
-
21
-
22
-
23
-
24
-
25
-
26
-
27
-
28
-
29
-
30
-
31
-
32
-
33
-
34
-
35
-
36
-
37
-
38
-
39
-
40
-
41
-
42
-
43
-
44
-
45
-
46
-
47
-
48
-
49
-
50
-
51
-
52
-
53
-
54
-
55
-
56
-
57
-
58
-
59
-
60
-
61
-
62
-
63
-
64
 |
 |
