JVC GZ-HM440US Basic User Guide - Page 5
Names of Parts and Functions
 |
View all JVC GZ-HM440US manuals
Add to My Manuals
Save this manual to your list of manuals |
Page 5 highlights
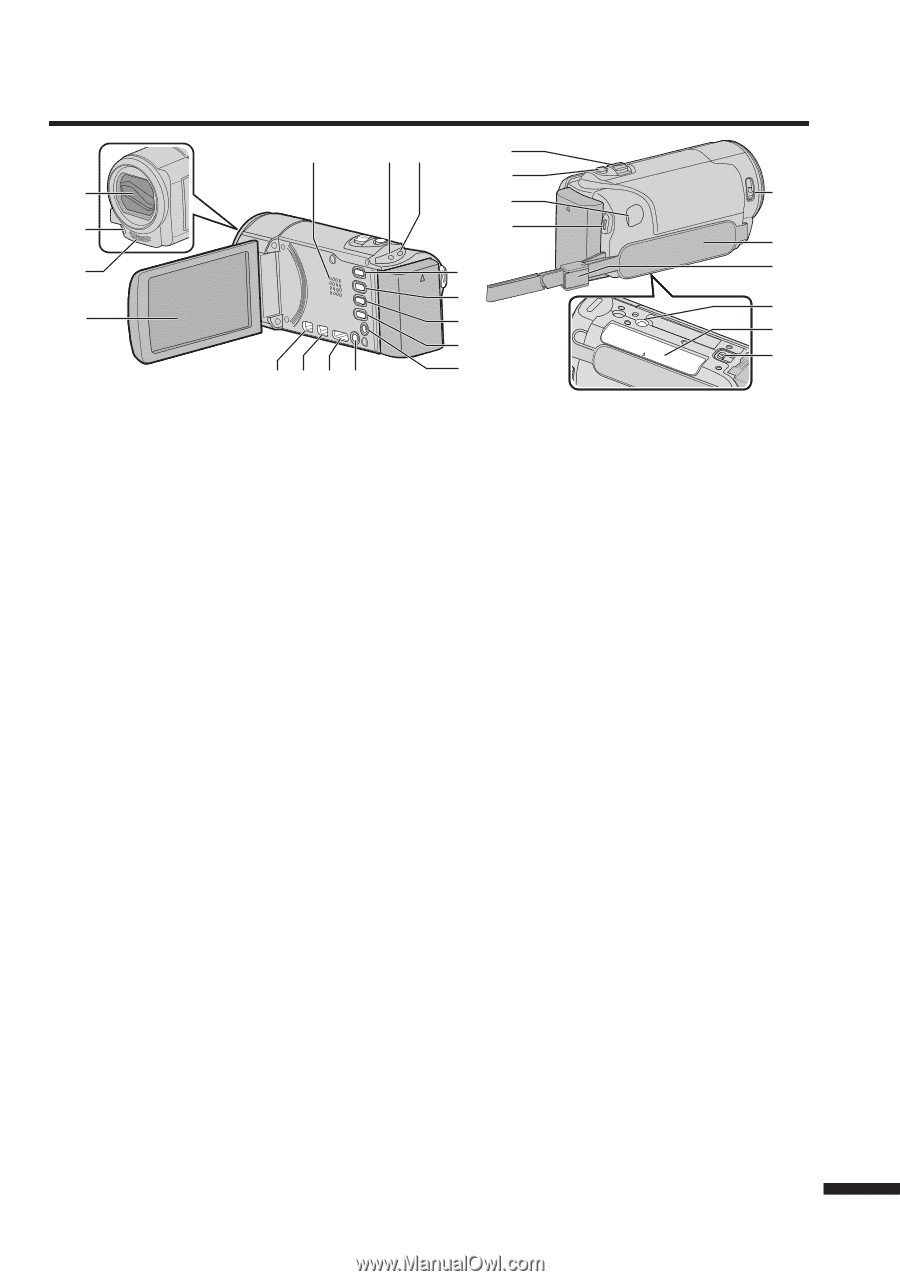
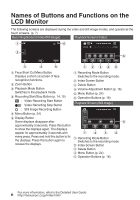
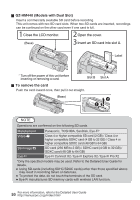
Names of Parts and Functions 5 67 g h 1 i k 2 j l 3 8 m 4 9 0 n o a fedc b p . A Lens Cover B Light (GZ-HM690/GZ-HM670/GZ-HM650) C Stereo Microphone D LCD Monitor Turns on/off the power by opening/ closing the LCD monitor. E Speaker F ACCESS (Access) Lamp Lights up/blinks during recording or playback. G POWER/CHARGE (Power/Charge) Lamp (p. 8) H i.AUTO (Intelligent Auto) Button (p. 14) Switches between Intelligent Auto and Manual modes. I USER (User) Button J A/B (Video/Still Image) Button Switches between video and still image modes. K INFO (Information) Button Recording : Displays the remaining time (for video only) and battery power. Playback : Displays file information such as recording date. L AV Connector (p. 18, 20) M M (Power) Button Press and hold to turn the power on/off while the LCD monitor is opened. N HDMI Mini Connector (p. 17) O USB Connector (p. 23) P COMPONENT (Component) Connector (p. 17) Q Zoom/Volume Lever (p. 14, 16) R SNAPSHOT (Still Image Recording) Button (p. 15) S DC Connector (p. 8) T START/STOP (Video Recording) Button (p. 14) U Lens Cover Switch (p. 14) V Grip Belt (p. 9) W Strap Lock (p. 9) X Tripod Mounting Hole Y SD Card Slot (p. 9) Z Battery Release Lever (p. 8) 5 For more information, refer to the Detailed User Guide http://manual.jvc.co.jp/index.html/
-
 1
1 -
 2
2 -
 3
3 -
 4
4 -
 5
5 -
 6
6 -
 7
7 -
 8
8 -
 9
9 -
 10
10 -
 11
11 -
12
-
13
-
14
-
15
-
16
-
17
-
18
-
19
-
20
-
21
-
22
-
23
-
24
-
25
-
26
-
27
-
28
-
29
-
30
-
31
-
32
-
33
-
34
-
35
-
36
-
37
-
38
-
39
-
40
-
41
-
42
-
43
-
44
-
45
-
46
-
47
-
48
-
49
-
50
-
51
-
52
-
53
-
54
-
55
-
56
-
57
-
58
-
59
-
60
-
61
-
62
-
63
-
64
 |
 |