JVC GZ-HM440US Basic User Guide - Page 20
Dubbing Files by Connecting to a DVD Recorder or VCR
 |
View all JVC GZ-HM440US manuals
Add to My Manuals
Save this manual to your list of manuals |
Page 20 highlights
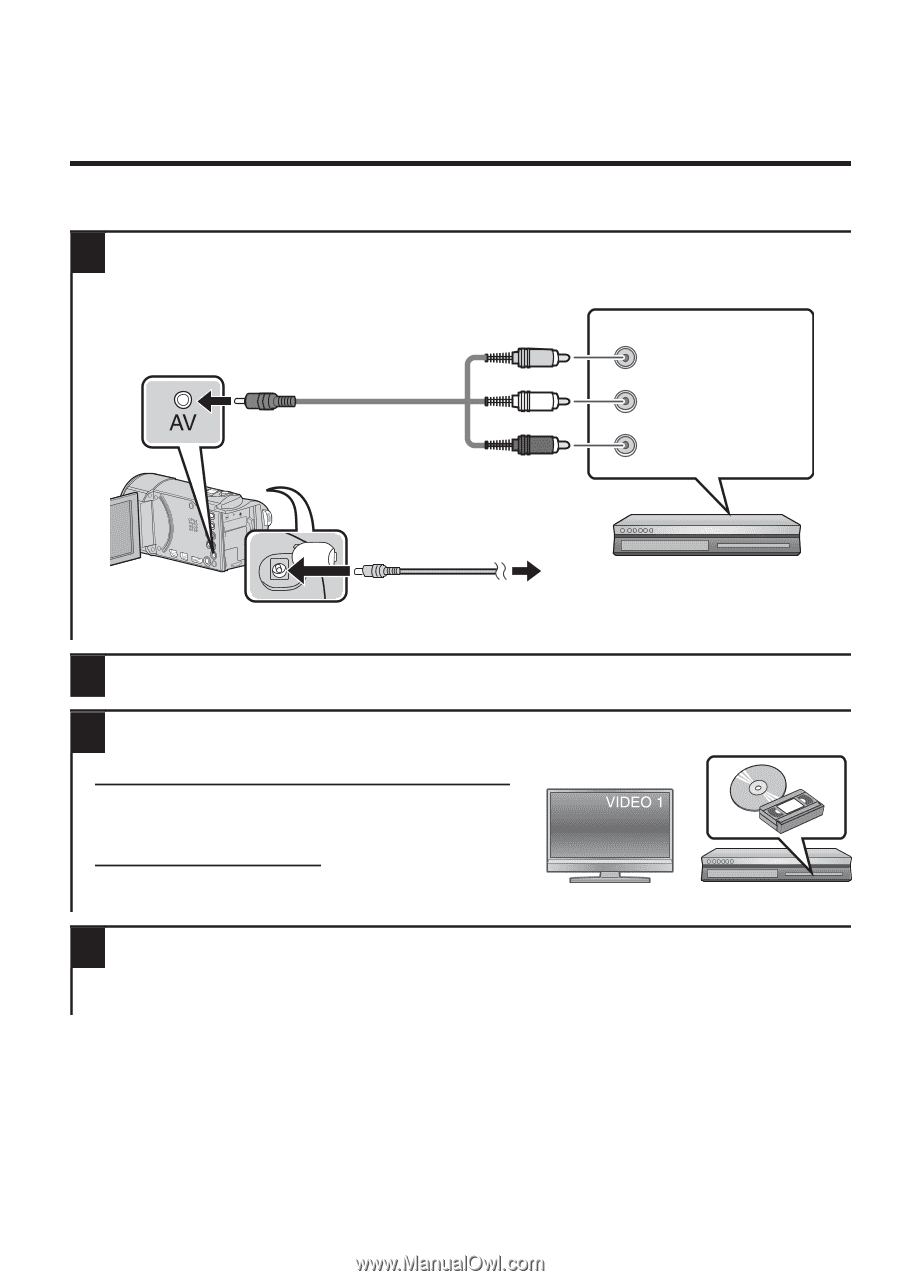
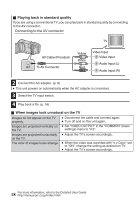
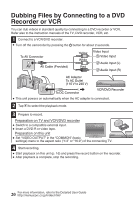
Dubbing Files by Connecting to a DVD Recorder or VCR You can dub videos in standard quality by connecting to a DVD recorder or VCR. Refer also to the instruction manuals of the TV, DVD recorder, VCR, etc. 1 Connect to a VCR/DVD recorder. 0 Turn off the camcorder by pressing the M button for about 2 seconds. To AV Connector AV Cable (Provided) Yellow White Red Video Input Video Input Audio Input (L) Audio Input (R) AC Adapter To AC Outlet (110 V to 240 V) To DC Connector VCR/DVD Recorder . 0 This unit powers on automatically when the AC adapter is connected. 2 Tap L to select the playback mode. 3 Prepare to record. Preparation on TV and VCR/DVD recorder 0 Switch to a compatible external input. 0 Insert a DVD-R or video tape. Preparation on this unit 0 Set "VIDEO OUTPUT" in the "COMMON" (basic settings) menu to the aspect ratio ("4:3" or "16:9") of the connecting TV. 4 Start recording. 0 Start playback on this unit (p. 16) and press the record button on the recorder. 0 After playback is complete, stop the recording. 20 For more information, refer to the Detailed User Guide http://manual.jvc.co.jp/index.html/
-
 1
1 -
2
-
3
-
4
-
5
-
6
-
7
-
8
-
9
-
10
-
11
-
12
-
13
-
14
-
 15
15 -
 16
16 -
 17
17 -
 18
18 -
 19
19 -
 20
20 -
 21
21 -
 22
22 -
 23
23 -
 24
24 -
 25
25 -
26
-
27
-
28
-
29
-
30
-
31
-
32
-
33
-
34
-
35
-
36
-
37
-
38
-
39
-
40
-
41
-
42
-
43
-
44
-
45
-
46
-
47
-
48
-
49
-
50
-
51
-
52
-
53
-
54
-
55
-
56
-
57
-
58
-
59
-
60
-
61
-
62
-
63
-
64
 |
 |