JVC KY-F550U Instruction Manual - Page 20
Connecting the Power Supply, Notes
 |
View all JVC KY-F550U manuals
Add to My Manuals
Save this manual to your list of manuals |
Page 20 highlights
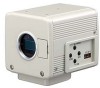
2. Preparation Before Shooting (continued) Connecting the Power Supply Connect the [DC IN] terminal at the back of this unit to the [TO CAMERA] terminal of the AC adaptor (AAP700) using the power cable supplied (2 m). AC IN AA-P700 AC 120 V AC Adapter DC 12V=OUTPUT VIDEO OUTPUT S(Y/C) OUTPUT TO CAMERA RGB, Y/C, SYNC OUT DV LENS VIDEO OUT TRGGER POWER DC IN EITHER OUTPUT MAX 1.25A SEE INSTRUCTION MANUAL REMORT SEE INSTRUCTION MANUAL White Marking [TO CAMERA] Terminal [DC IN] Terminal Connect the end with white marking to the AC adaptor. Power Cable (2 m) (accessories) POWER DC IN ● Insert plug fully, turn ring and ensure that it is fastened. Plug Ring Notes ● Ensure to make use of AA-P700 for the power supply. When connecting, ensure that power switch of AA-P700 is turned OFF. Connecting with the power on may give rise to malfunction of the equipment. ● When power is supplied, it takes several seconds before this unit is operable. When the "SHUTTER" item under "EXPOSURE" screen is set to "SLOW", it might take even longer time. ● Allow a 10 second interval after switching off the power before turning on again. If the power switch is turned ON and OFF too soon, malfunctioning such as startup failure may occur. 18
-
 1
1 -
2
-
3
-
4
-
5
-
6
-
7
-
8
-
9
-
10
-
11
-
12
-
13
-
14
-
 15
15 -
 16
16 -
 17
17 -
 18
18 -
 19
19 -
 20
20 -
 21
21 -
 22
22 -
 23
23 -
 24
24 -
 25
25 -
26
-
27
-
28
-
29
-
30
-
31
-
32
-
33
-
34
-
35
-
36
-
37
-
38
-
39
-
40
-
41
-
42
-
43
-
44
-
45
-
46
-
47
-
48
-
49
-
50
-
51
-
52
-
53
-
54
-
55
-
56
 |
 |
