Kenmore 7754 Use and Care Guide - Page 40
Kenmore 7754 - Elite 30 in. Gas Range Manual
 |
View all Kenmore 7754 manuals
Add to My Manuals
Save this manual to your list of manuals |
Page 40 highlights
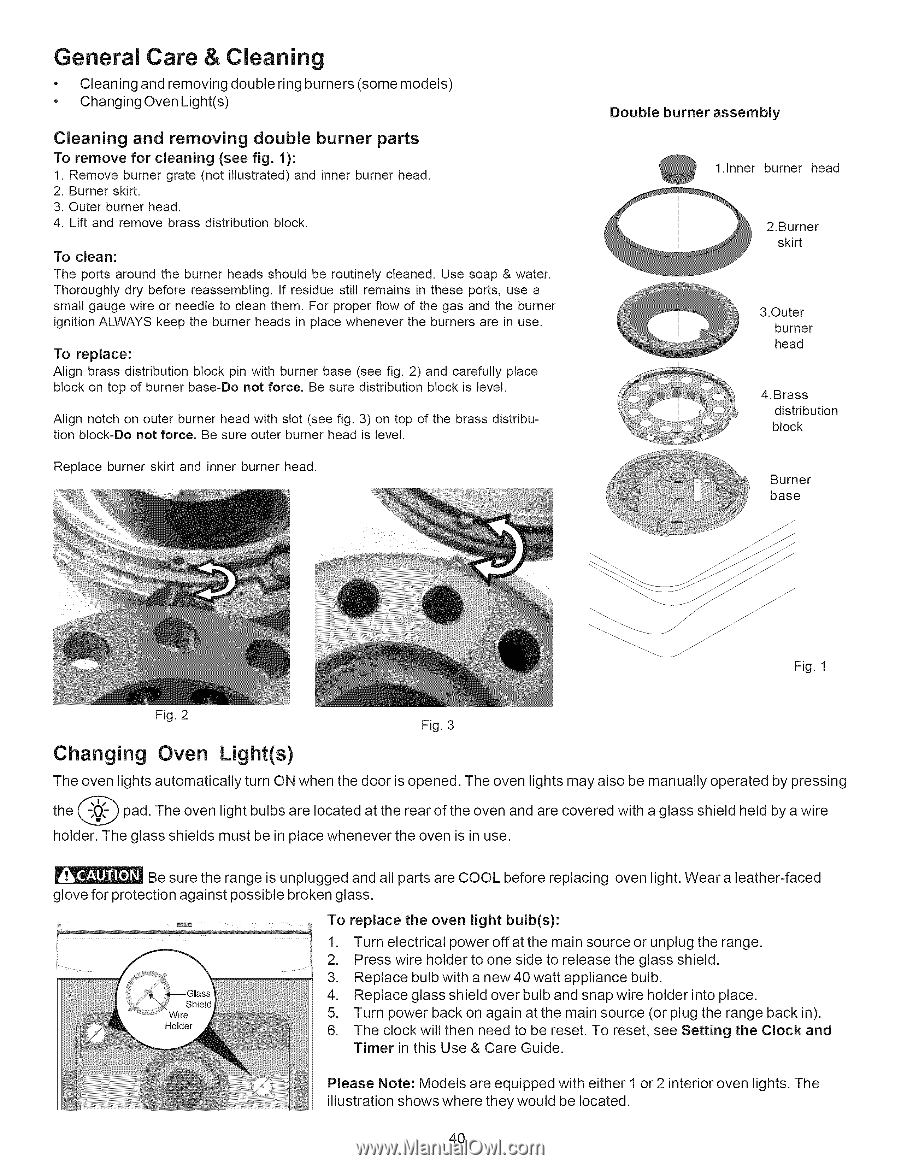
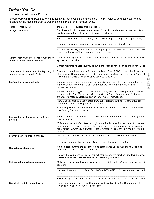
General Care & Cleaning • • Cleaning and removing double ring burners (some models) Changing Oven Light(s) Double burner assembly Cleaning and removing double burner parts 1.Inner burner head To remove for cleaning (see fig. 1): 1. Remove burner grate (not illustrated) and inner burner head. 2. Burner skirt. 3. Outer burner head. 4. Lift and remove brass distribution block. To clean: The ports around the burner heads should be routinely cleaned. Use soap & water. Thoroughly dry before reassembling. If residue still remains in these ports, use a small gauge wire or needle to clean them. For proper flow of the gas and the burner ignition ALWAYS keep the burner heads in place whenever the burners are in use. To replace: Align brass distribution block pin with burner base (see fig. 2) and carefully place block on top of burner base-Do not force. Be sure distribution block is level. Align notch on outer burner head with slot (see fig. 3) on top of the brass distribution block-Do not force. Be sure outer burner head is level. Replace burner skirt and inner burner head. 2.Burner skirt 3.Outer burner head 4.Brass distribution block Burner base Fig. 1 Fig. 2 Fig. 3 Changing Oven Light(s) The oven lights automatically turn ON when the door is opened. The oven lights may also be manually operated by pressing the d,O,'-_ pad. The oven light bulbs are located at the rear of the oven and are covered with a glass shield held by a wire holder. The glass shields must be in place whenever the oven is in use. Be sure the range is unplugged and all parts are COOL before replacing oven light. Weara leather-faced glove for protection against possible broken glass. To replace the oven light bulb(s): 1. 2. 3. 4. 5. 6. Turn electrical power off at the main source or unplug the range. Press wire holder to one side to release the glass shield. Replace bulb with a new 40 watt appliance bulb. Replace glass shield over bulb and snap wire holder into place. Turn power back on again at the main source (or plug the range back in). The clock will then need to be reset. To reset, see Setting the Clock and Timer in this Use & Care Guide. Holder Please Note: Models are equipped with either I or2 interior oven lights. The illustration shows where they would be located. 4O
-
 1
1 -
2
-
3
-
4
-
5
-
6
-
7
-
8
-
9
-
10
-
11
-
12
-
13
-
14
-
15
-
16
-
17
-
18
-
19
-
20
-
21
-
22
-
23
-
24
-
25
-
26
-
27
-
28
-
29
-
30
-
31
-
32
-
33
-
34
-
 35
35 -
 36
36 -
 37
37 -
 38
38 -
 39
39 -
 40
40 -
 41
41 -
 42
42 -
 43
43 -
 44
44
 |
 |