Kenwood CMOS-310 User Manual - Page 10
Overhead View Image Adjustment, Up-and-Down Angle, For Guideline Adjustment
 |
View all Kenwood CMOS-310 manuals
Add to My Manuals
Save this manual to your list of manuals |
Page 10 highlights
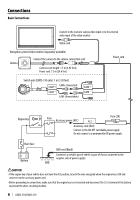
Camera Setting (CMOS-310 only) Overhead View Image Adjustment (Up-and-Down Angle) This item adjusts the vertical angle (inclination) of the camera installation position. 1 Select "OVERHEAD VIEW IMAGE ADJUSTMENT (Up-and-Down ANGLE)". 2 Press the + or - button of the switch unit so that the lines indicating the vehicle width are shown vertical. Adjustment is possible by one step up and down. If the adjustment is not possible in the currently available range, change the camera position before retrying. 3 After completing the adjustment, press the view button. 4 Select [Next]. Advances to "WIDE VIEW GUIDELINE ADJUSTMENT (Size)". For Guideline Adjustment • The subsequent adjustments adjust the sizes, lengths and positions of the guidelines displayed in the wide view and overhead view. By default, three guidelines shown below (green, yellow and red) are displayed assuming that the camera installation height is 80 cm (2.62 feet) and that the distance between the left and right lines of the parking space is 2.2 meters (7.22 feet). Adjusting the wide view or overhead guidelines alters the interval between the corresponding guidelines. As the interval between each set of guidelines varies depending on the camera installation height, check the actual settings after all of the following adjustments are completed. • Once the interval between guidelines has been adjusted according to your parking space, the displayed guidelines do no longer indicate the width of the vehicle. Note that the sizes of parking space are greatly variable and confirm the actual size of each parking space before attempting to park in it. • The orange line indicates the position of the overhead view (area on the near side of the orange line) and of the wide view (area beyond the orange line) in the PinP view (page 14). When the orange line displayed in the wide view exceeds the parking line, slow down the vehicle and move until the red line (parking position) by checking it in the overhead view. • The red line is used to indicate the parking position and can set it independently from other guide lines. 2.2 m (7.22 feet) Green 0.5 m (1.64 feet) Orange Yellow Red 2.7 m (8.86 feet) 10 | CMOS-310/CMOS-210
-
 1
1 -
2
-
3
-
4
-
 5
5 -
 6
6 -
 7
7 -
 8
8 -
 9
9 -
 10
10 -
 11
11 -
 12
12 -
 13
13 -
 14
14 -
 15
15 -
16
-
17
-
18
-
19
-
20
-
21
-
22
-
23
-
24
-
25
-
26
-
27
-
28
-
29
-
30
-
31
-
32
-
33
-
34
-
35
-
36
-
37
-
38
-
39
-
40
-
41
-
42
-
43
-
44
-
45
-
46
-
47
-
48
-
49
-
50
-
51
-
52
-
53
-
54
-
55
-
56
-
57
-
58
-
59
-
60
-
61
-
62
-
63
-
64
-
65
-
66
-
67
-
68
-
69
-
70
-
71
-
72
-
73
-
74
-
75
-
76
-
77
-
78
-
79
-
80
-
81
-
82
-
83
-
84
-
85
-
86
-
87
-
88
-
89
-
90
-
91
-
92
-
93
-
94
-
95
-
96
-
97
-
98
-
99
-
100
-
101
-
102
-
103
-
104
-
105
-
106
-
107
-
108
-
109
-
110
-
111
-
112
-
113
-
114
-
115
-
116
 |
 |
