Kenwood CMOS-310 User Manual - Page 2
Before Use/ Installation Procedure
 |
View all Kenwood CMOS-310 manuals
Add to My Manuals
Save this manual to your list of manuals |
Page 2 highlights
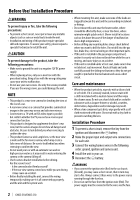
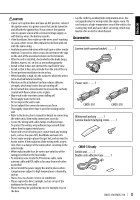
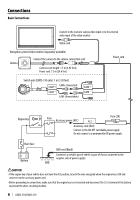
Before Use/ Installation Procedure WARNING To prevent injury or fire, take the following precautions: • To prevent a short circuit, never put or leave any metallic objects (such as coins or metal tools) inside the unit. • Installation and wiring of this product require specialist skill and experience. To assure your safety, please request a specialist technician to install the unit. CAUTION To prevent damage to the product, take the following precautions: • Make sure to ground the unit to a negative 12V DC power supply. • When replacing a fuse, only use a new fuse with the prescribed rating. Using a fuse with the wrong rating may cause your unit to malfunction. • Do not use your own screws. Use only the screws provided. If you use the wrong screws, you could damage the unit. NOTE • This product is a rear view camera for checking the view at the rear of a car. • A rear view camera is a camera that provides symmetrical images in the same way as rear and side view mirrors. • Connection to a TV with an RCA video input is possible, but confirm whether the TV you use has a reverse gear connection function. • This product is designed to supplement the driver's rear view, but the camera images do not show all dangers and obstacles. Be sure to look behind you when reversing to confirm the view. • This product features a wide-angle lens, so the near view is wide and the far view is narrow, which may create a false sense of distance. Be sure to look behind you when reversing to confirm the view. • Do not wash your car with an automatic car wash or high-pressure water as it may result in water entering the camera or the camera falling off. • Check camera bracket installation before driving. Are the screws loose? - Is the camera bracket firmly secured? - If the rear view camera comes loose while you are driving it may cause an accident. • Before finally installing the unit, connect the wiring temporarily, making sure it is all connected up properly, and the unit and the system work. • When mounting this unit, make sure none of the leads are trapped between this unit and the surrounding metalwork or fittings. • Do not mount this unit near the heater outlet, where it would be affected by heat, or near the doors, where rainwater might splash onto it. (Never install in locations such as the above because of the danger of malfunction due to high temperatures.) • Before drilling any mounting holes always check behind where you want to drill the holes. Do not drill into the gas line, brake line, electrical wiring or other important parts. • If this unit is installed in the passenger compartment, anchor it securely so it does not break free while the car is moving, and cause injury or an accident. • If this unit is installed under a front seat, make sure it does not obstruct seat movement. Route all leads and cords carefully around the sliding mechanism so they do not get caught or pinched in the mechanism and cause a short circuit. Care and maintenance • When the product gets dirty, wipe dry with a silicon cloth or soft cloth. If it is seriously stained, remove stain with a cloth moistened with a neutral cleaner and then wipe the cleaner away. Do not use a hard cloth and/or a volatile substance such as lacquer thinner or alcohol, scratches, deformation, degradation and/or damage may result. • When a lens component gets dirty, wipe gently with a soft cloth moistened with water. Do not rub with a dry cloth to prevent scratching the lens. Installation Procedure 1 To prevent a short circuit, remove the key from the ignition and disconnect the - battery. 2 Make the proper input and output wire connections for each unit. 3 Connect the wiring harness wires in the following order: ground, ignition and camera unit. 4 Install the unit in your car. 5 Reconnect the - battery. WARNING • If you connect the ignition wire (Red) to the car chassis (Ground), you may cause a short circuit, that in turn may start a fire. Always connect those wires to the power source running through the fuse box. • Do not cut out the fuse from the ignition wire (Red). The power supply must be connected to the wires via the fuse. 2 | CMOS-310/CMOS-210
-
 1
1 -
 2
2 -
 3
3 -
 4
4 -
 5
5 -
 6
6 -
 7
7 -
 8
8 -
9
-
10
-
11
-
12
-
13
-
14
-
15
-
16
-
17
-
18
-
19
-
20
-
21
-
22
-
23
-
24
-
25
-
26
-
27
-
28
-
29
-
30
-
31
-
32
-
33
-
34
-
35
-
36
-
37
-
38
-
39
-
40
-
41
-
42
-
43
-
44
-
45
-
46
-
47
-
48
-
49
-
50
-
51
-
52
-
53
-
54
-
55
-
56
-
57
-
58
-
59
-
60
-
61
-
62
-
63
-
64
-
65
-
66
-
67
-
68
-
69
-
70
-
71
-
72
-
73
-
74
-
75
-
76
-
77
-
78
-
79
-
80
-
81
-
82
-
83
-
84
-
85
-
86
-
87
-
88
-
89
-
90
-
91
-
92
-
93
-
94
-
95
-
96
-
97
-
98
-
99
-
100
-
101
-
102
-
103
-
104
-
105
-
106
-
107
-
108
-
109
-
110
-
111
-
112
-
113
-
114
-
115
-
116
 |
 |
