KitchenAid KHB1231CU Use & Care Guide - Page 11
Using the Twist Lock Blending Arm - 2 speed immersion blender
 |
View all KitchenAid KHB1231CU manuals
Add to My Manuals
Save this manual to your list of manuals |
Page 11 highlights
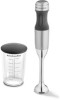
Operating Your Hand Blender Using the Twist Lock Blending Arm Use the Blending Arm attachment for smoothies, milk shakes, soup, cooked vegetables, frosting, or baby food. 1. Insert Blending Arm attachment into motor body and twist to lock. Insert Hand Blender with Blending Arm attached into the jar containing ingredients at an angle. Use your free hand to cover the top of the blending jar for better stability and avoid splattering. Remember to stop the Hand Blender before removing it from the jar to avoid splashing. Blending English Rest the Hand Blender on the bottom of the jar momentarily then hold at an angle and slowly draw it upwards against the side of the jar. As the Hand Blender is drawn up you will notice the ingredients from the bottom of the jar being drawn up. When the ingredients are no longer being drawn up from the bottom, return the Hand Blender to the bottom of the jar and repeat the process until the ingredients are at the desired consistency. 2. Plug the electrical cord into an electrical wall socket. 3. Set Hand Blender on Speed 1. Adjust the speed by turning the speed control dial on top of the Hand Blender. 4. Insert the Hand Blender into the mixture. NOTE: Hand Blender should only be immersed in liquids the length of the attachment. Do not submerge beyond the seam of the blending attachment. Do not immerse the motor body into liquids or other mixtures. 5. Press the Power button to activate the Hand Blender. 6. When blending is complete, release the power button before removing Hand Blender from the mixture. 7. Unplug immediately after use, before removing or changing attachments. Drawing up Using a light circular motion from your wrist, draw the Hand Blender up slightly and let it fall again into the ingredients. Allow your wrist motion and the weight of the Hand Blender to do the work. Wrist movement 11
-
 1
1 -
2
-
3
-
4
-
5
-
 6
6 -
 7
7 -
 8
8 -
 9
9 -
 10
10 -
 11
11 -
 12
12 -
 13
13 -
 14
14 -
 15
15 -
 16
16 -
17
-
18
-
19
-
20
-
21
-
22
-
23
-
24
-
25
-
26
-
27
-
28
-
29
-
30
-
31
-
32
-
33
-
34
-
35
-
36
-
37
-
38
-
39
-
40
-
41
-
42
-
43
-
44
-
45
-
46
-
47
-
48
-
49
-
50
-
51
-
52
-
53
-
54
-
55
-
56
-
57
-
58
-
59
-
60
-
61
-
62
-
63
-
64
-
65
-
66
-
67
-
68
-
69
-
70
-
71
-
72
-
73
-
74
-
75
-
76
-
77
-
78
-
79
-
80
-
81
-
82
-
83
-
84
-
85
-
86
-
87
-
88
-
89
-
90
-
91
-
92
 |
 |
